The Give Menu under the “Manage Giving” menu, allows admins to view recent nonprofit donations made by employees, search for a nonprofit and make a donation.
At a Glance
Search for a Nonprofit
The Give page under “Manage Giving” allows you to view recent nonprofit donations made by employees, search for a nonprofit and make a donation.
To search for a specific nonprofit, enter the nonprofit’s name or EIN in the search bar.
You can also browser for nonprofits using the “Browse by Category” feature. This feature allows you to search nonprofits by category.
Make a Donation
Once you find a nonprofit, click on it to load a page with the charity details.
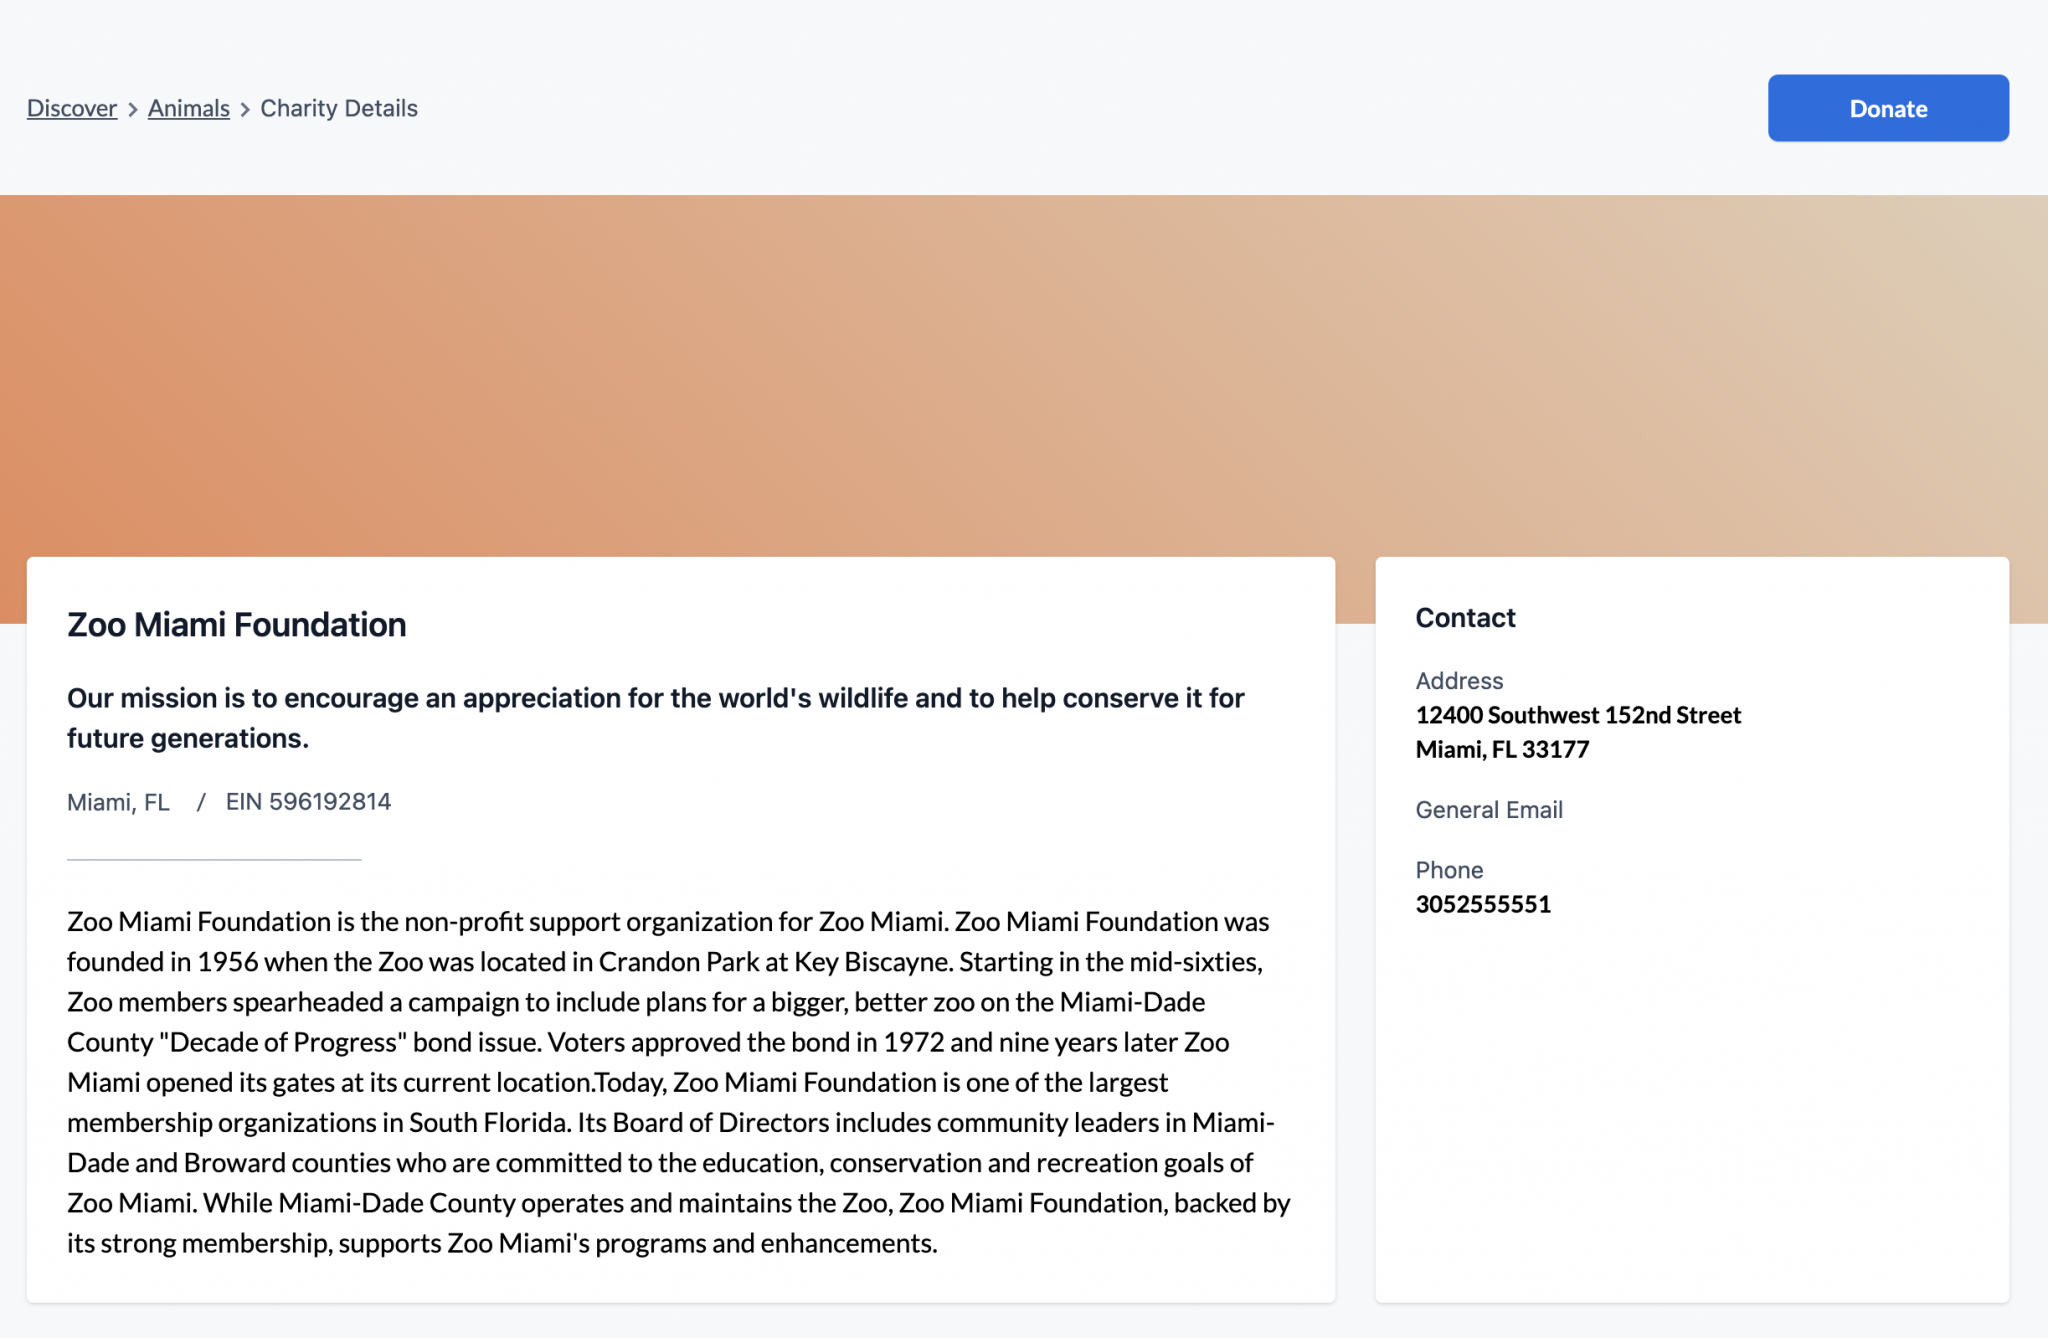
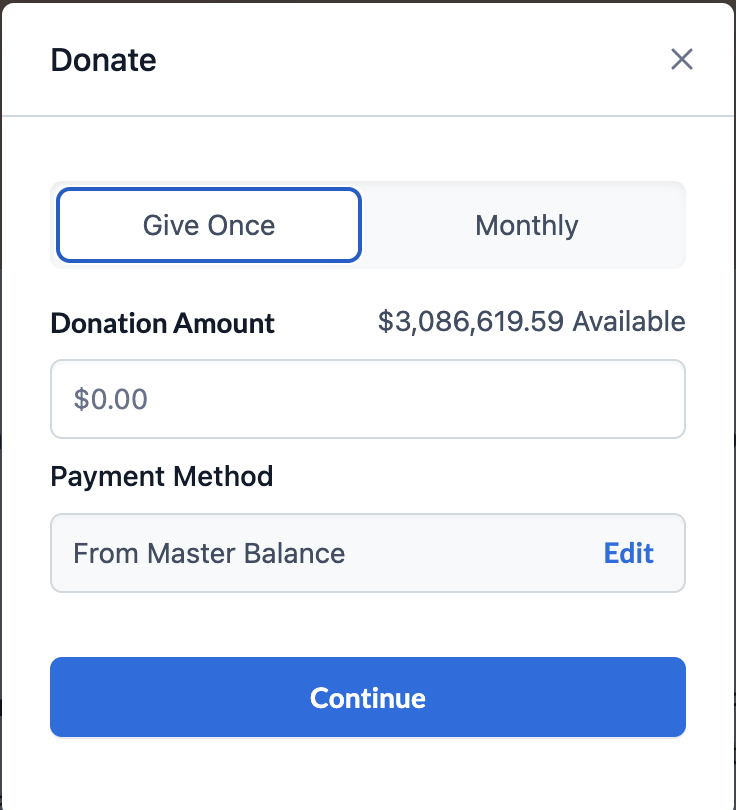
To donate, click on Donate. Fill in the details of your donation in the window that follows.
Click Continue, and a summary of the donation is displayed. Ensure all details are correct and click Make a Donation to submit the donation.
The Distribute Funds menu allows you to distribute funds manually on individual accounts, setup/stop auto distribution of funds on individual accounts, and view distribution of funds on individual accounts.
At a Glance
- Auto Distribute Funds
- Manually Distribute Funds
- Fund a Sub-Account
Auto Distribute Funds
Start by searching for the specific account you want to auto distribute funds for in the search bar. You can search by account name or account number.
Then under the “Auto Distribute?” column, click Yes. A new field is available to search for the charity name or EIN. Select the charity, and then click Submit to auto distribute the funds for that account.

Select Confirm to confirm the auto distribution.
Manually Distribute Funds
To manually distribute funds, start by searching for the specific account or account number in the search bar. Find the account you want to set up for manual distribution and click + Create a Distribution Activity.

Fill in the details of the new blank fields that become available and click Submit. Funds are then deducted from the account balance and show up under “Sub-Account Activity.”
Fund a Sub-Account and Remove Funds
To fund an individual sub-account, start by searching for the specific account or account number in the search bar.
After locating the account, click Transfer Funds. Then, select the source where the funds will be loaded from. By default the master account balance is selected. Additional methods populate if they have already been added.

Enter the amount to be deposited. Click Continue to finalize the transfer.
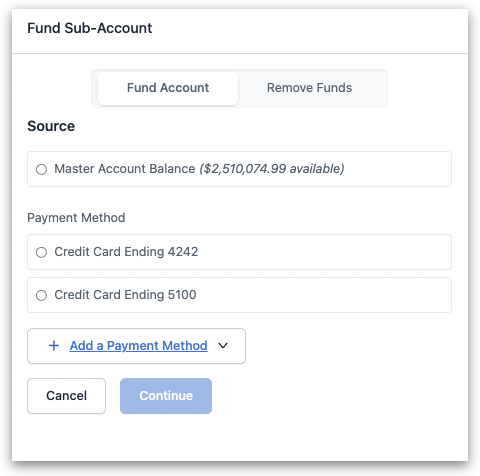
To remove funds, click Remove Funds and enter the amount to be removed. Click Submit to initiate the removal of funds.
The sub-account balance will decrease by the amount removed (up to the total balance in the sub-account), and the Master Account balance will increase by the amount removed from the sub-account.
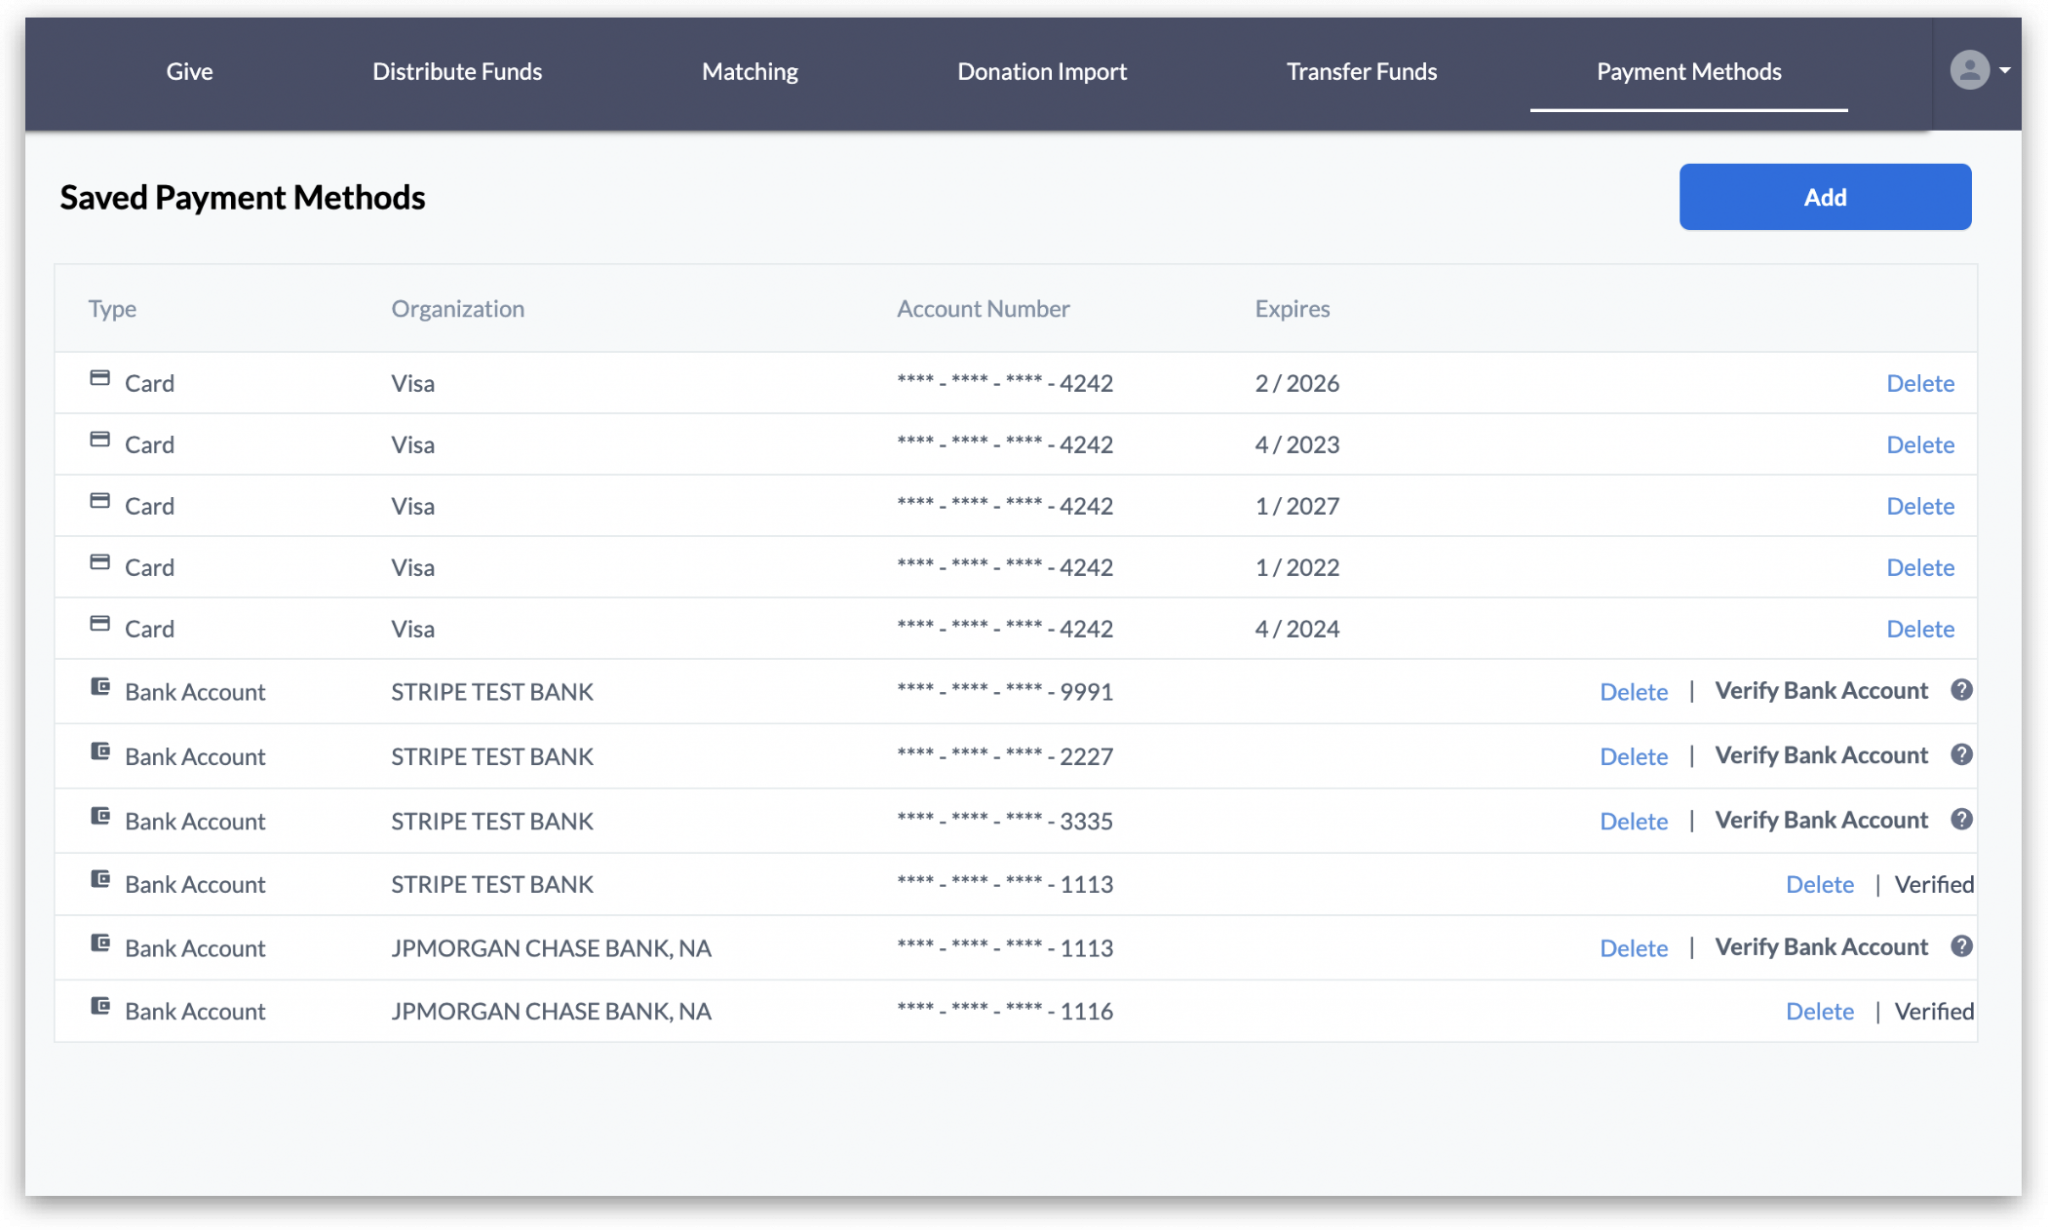
The payment methods menu allows admins to add and delete payment methods. A payment method can be saved either through a credit card or bank account.
At a Glance
- Add a Payment Method
- Delete a Payment Method
- Verify a New Bank Account
Add/Delete a Payment Method—Credit Card
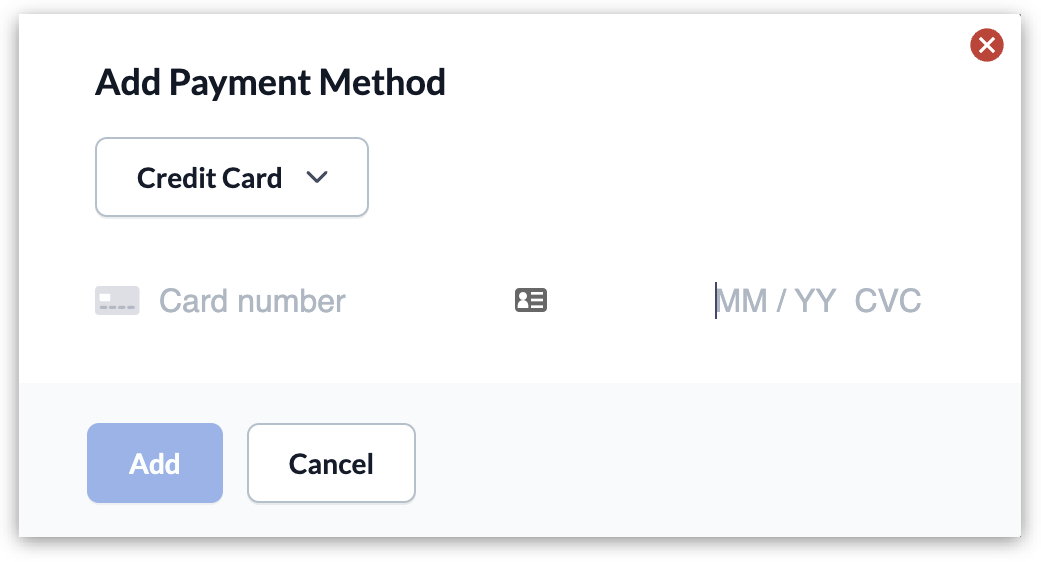
To add a new payment method, click Add. The “Add Payment Method” window allows you to choose a payment (credit card or bank) and enter payment details.
Credit Card
- Input your credit card information and click Add.
- You will receive a confirmation message, “Card Added,” and the card will populate on the list of saved payments on the screen.
To delete a payment method, click Delete.
Add a Payment Method—Bank
To verify and connect your bank account click
Connect Standard.
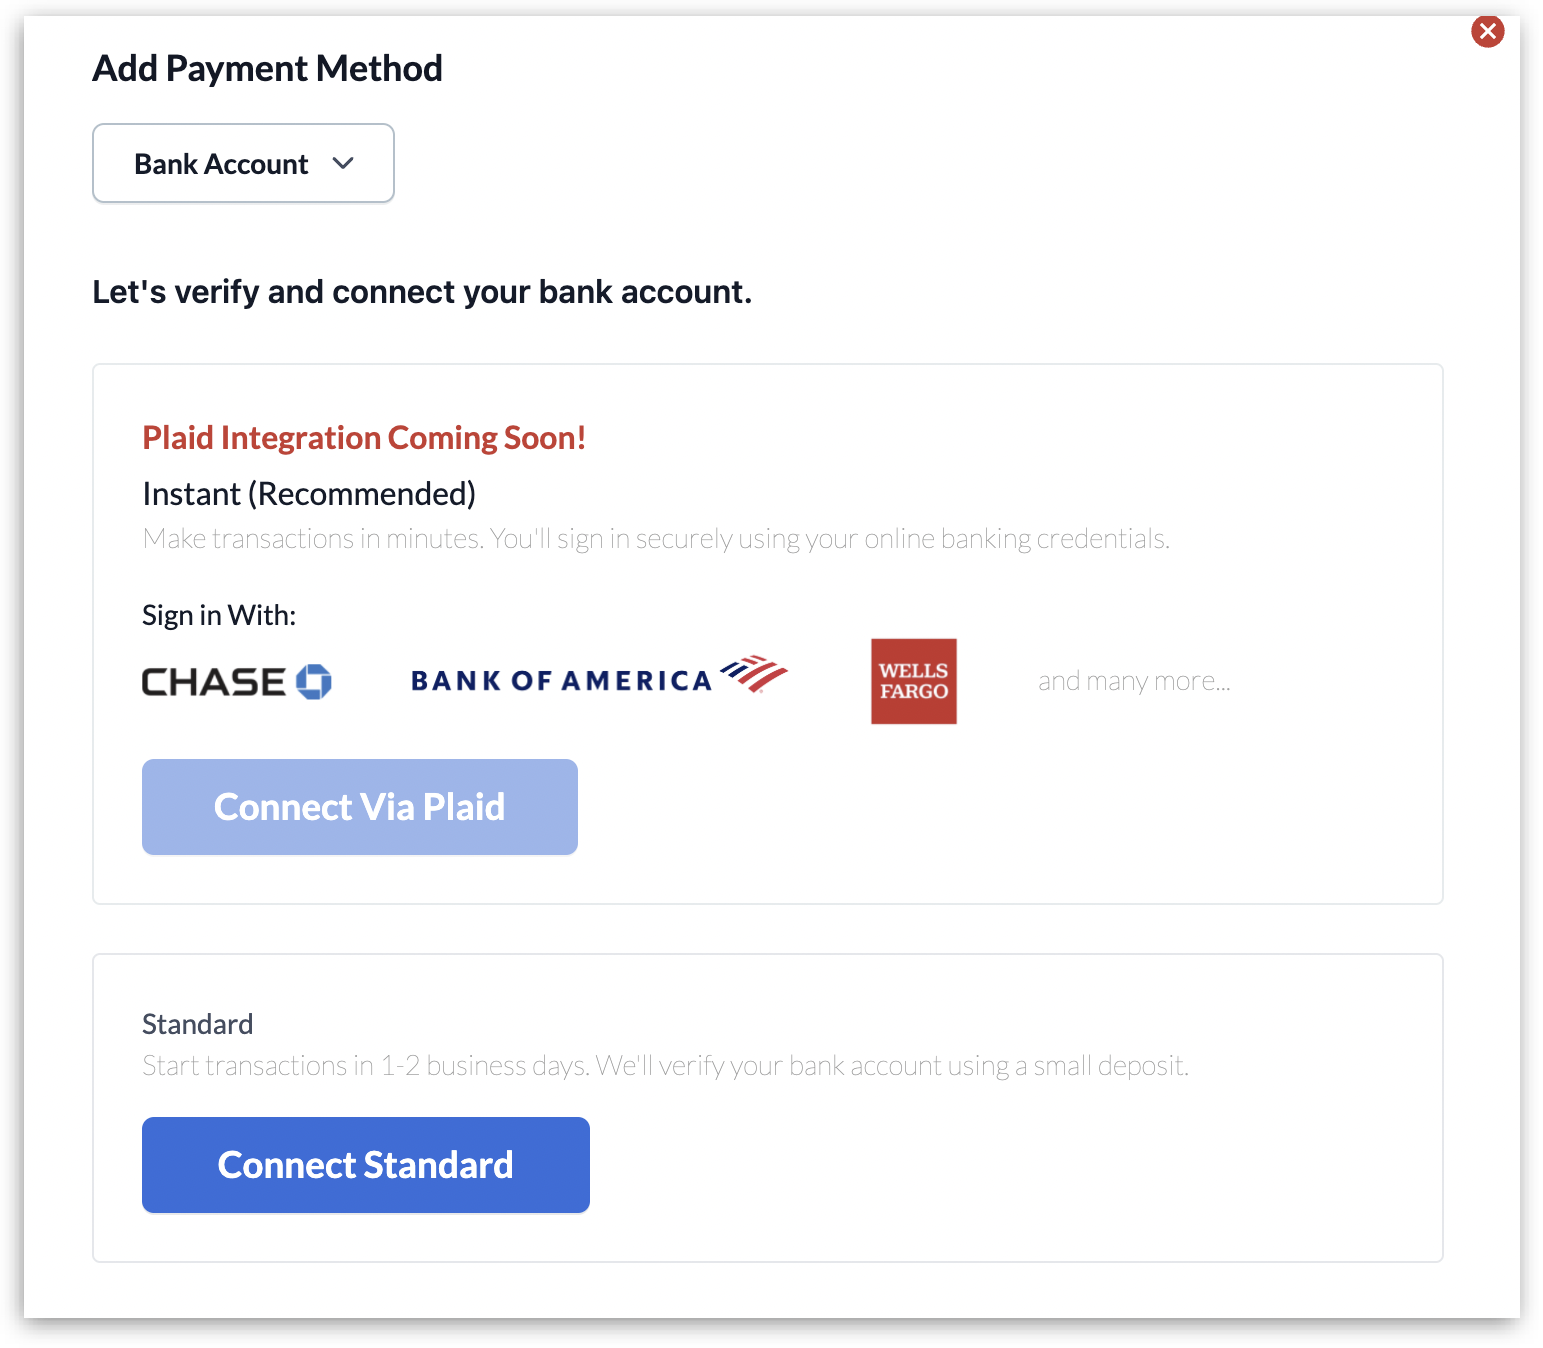
In the following window…
- Enter the routing and account numbers
- A new window opens to verify the account by entering the 2 small deposits that were sent to the checking account.
- Click Done to close the popup window
For further instructions on how to verify the new bank account click and read the “How to Verify a New Bank Account.”
Verify a New Bank Account
Locate the bank account that needs to be verified and click on Verify Bank Account.
- Blank fields will become available to enter the values of the two small deposits that were made to the new bank account.
- Click Verify.
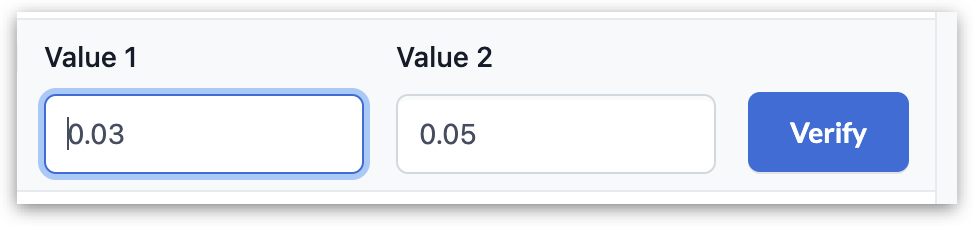
If successful you will receive the success message “Bank Account Successfully Verified,” and the account will be listed under “Saved Payment Methods.”
If incorrect values are entered you will receive the error message “The amounts provided do not match the amounts that were sent to the bank account.”
You have three tries to verify the new bank account with the correct values that were deposited.
The User Management menu under “Company Settings” allows you to view, edit and create account holders and administrators and view sub-account balances.
At a Glance
- Create an Account Holder
- Edit an Account
- Edit Matching Caps
Create an Account Holder
Navigate to the User Management menu under “Company Settings.” Click on Create a User. Fill in the fields of the following window that appears. Then, click Save. This new account and account information is displayed under “Users.”
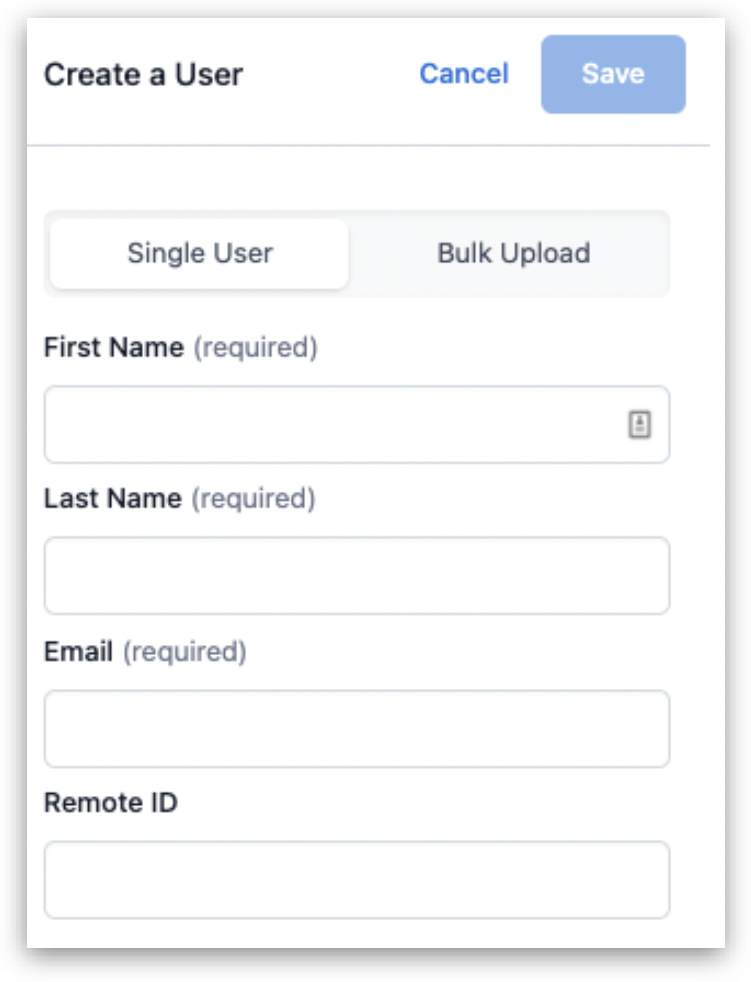
You also have the option to bulk upload via a CSV file. Note that the CSV file must be formatted properly:
- CSV must begin with a header:
- firstName
- lastName
- remoteid (optional)
Edit an Account
To edit an account holder, first locate the account holder that you want to edit by using the search bar or scrolling through the list of users.
Click Edit on the row of the account you want to edit. The following window displays the editable fields. Click Save to save your changes.
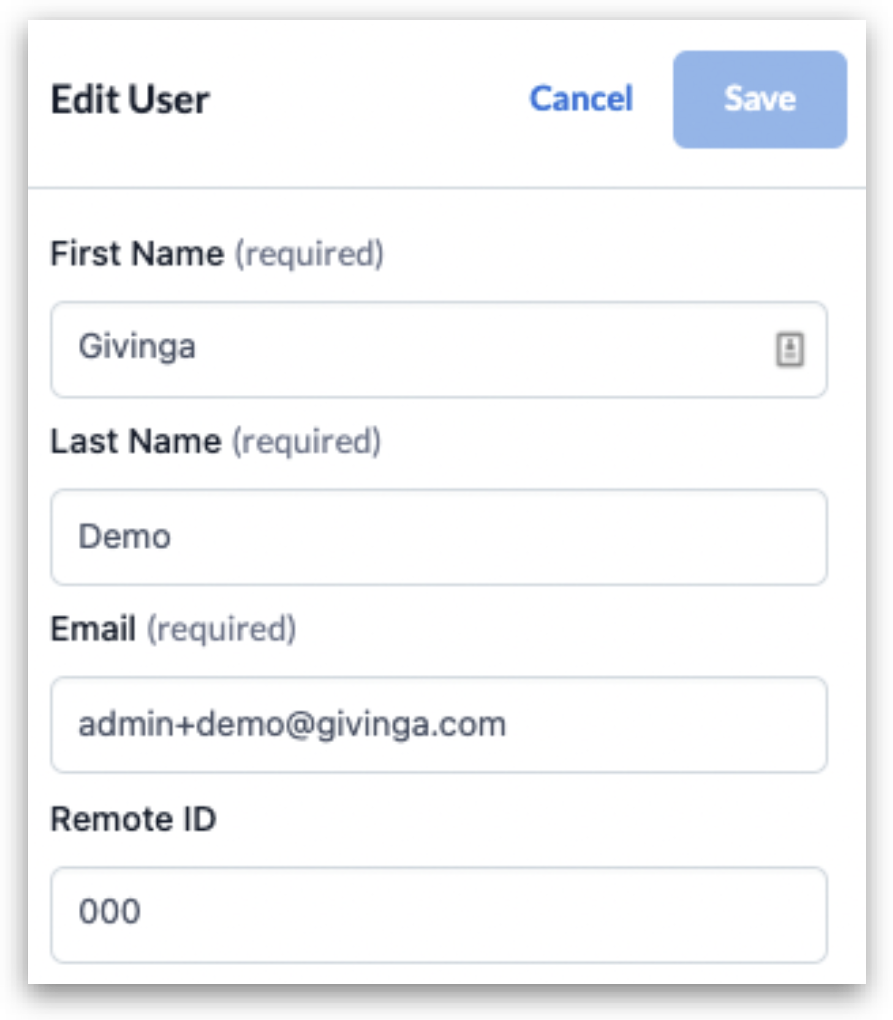
You can deactivate an Administrator account by clicking Deactivate Admin.
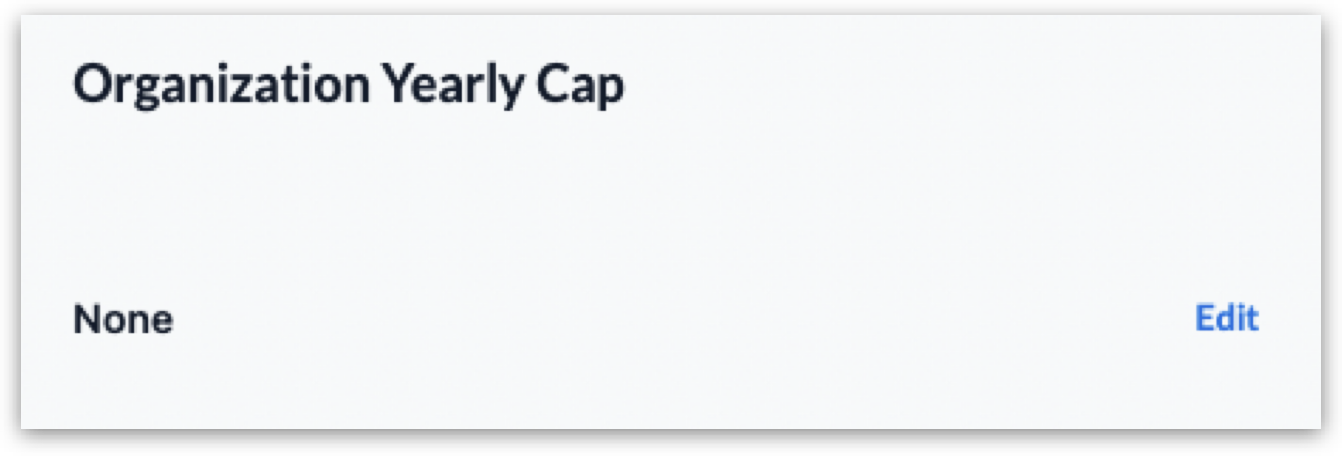
Edit Matching Caps
Navigate to the Matching Caps menu under “Company Settings.” This menu allows you to set or edit match caps for your organization (yearly), sub accounts (yearly), and transactions.
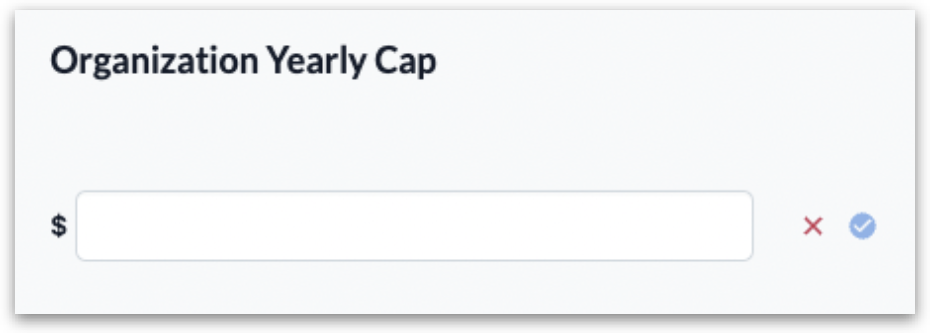
To set or edit a match cap click Edit in the match cap you’d like to edit.
Type the dollar amount for the cap you wish to set into the field. Then, click the checkmark, and the cap will be set.
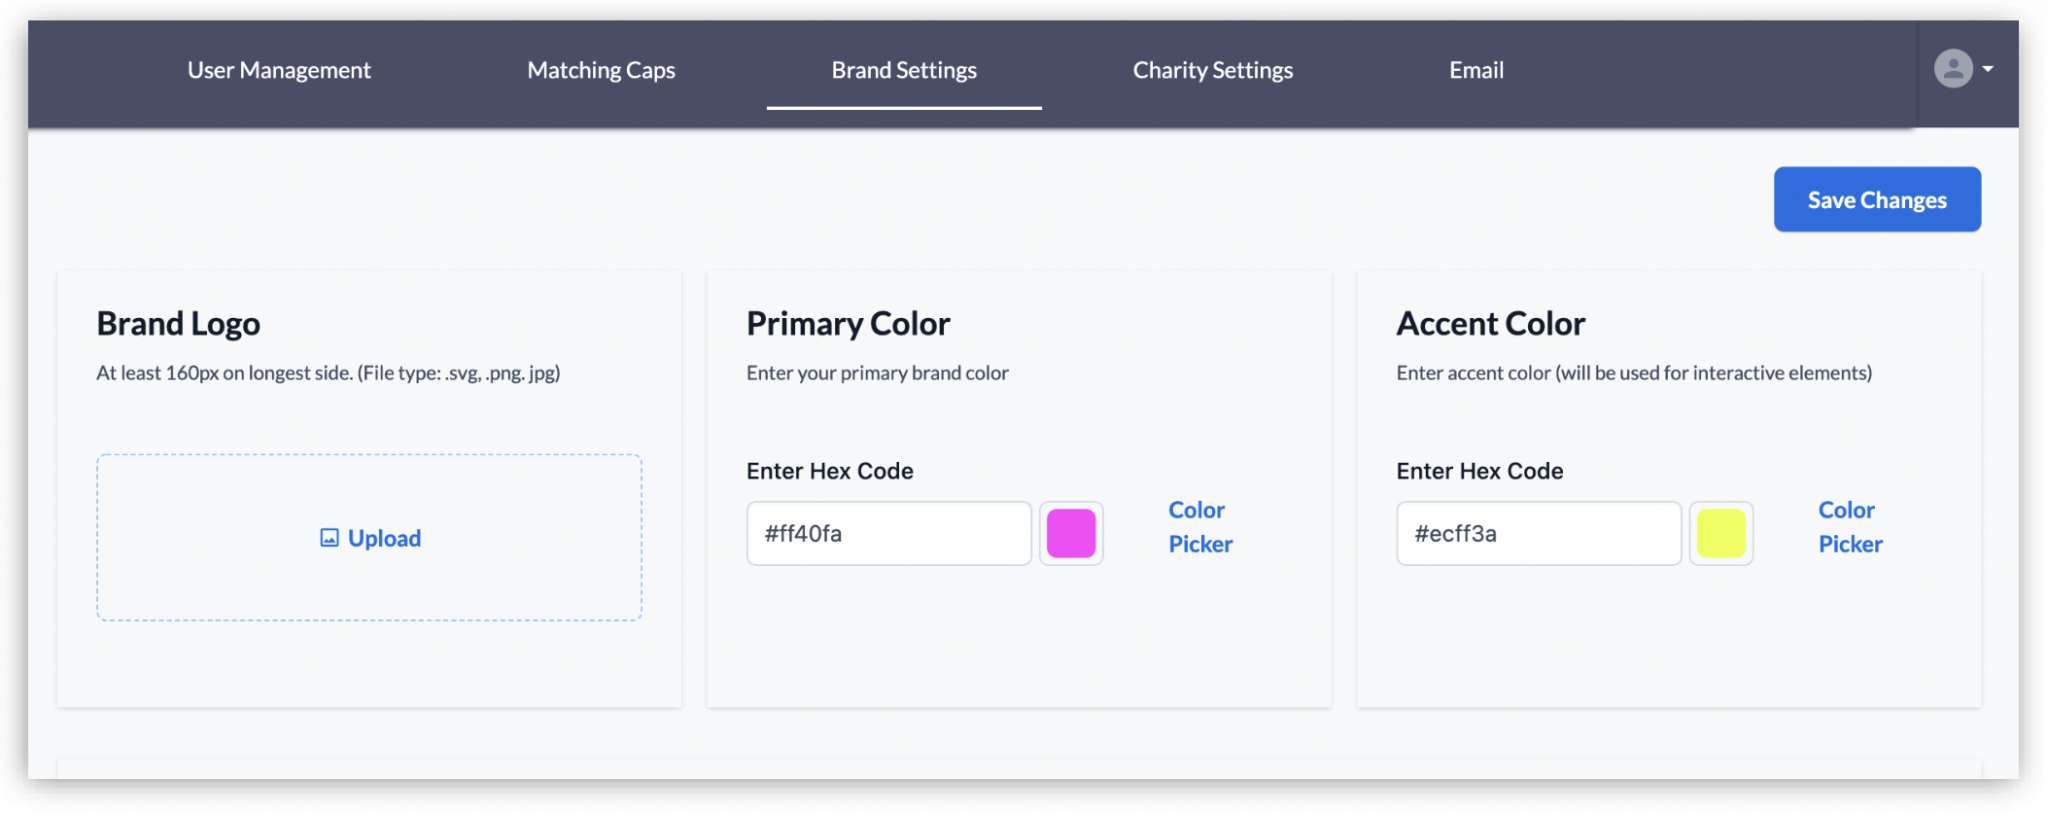
The Brand Settings menu under “Company Settings,” allows you to upload or change a brand logo, set or edit your brand primary and accent colors, and edit language and terms users may see.
At a Glance
- Edit Brand Settings
- Edit Language and Terms
Edit Brand Settings
Navigate to the Brand Settings menu under “Company Settings.”
To upload your brand logo, click Upload in the “Brand Logo” box.
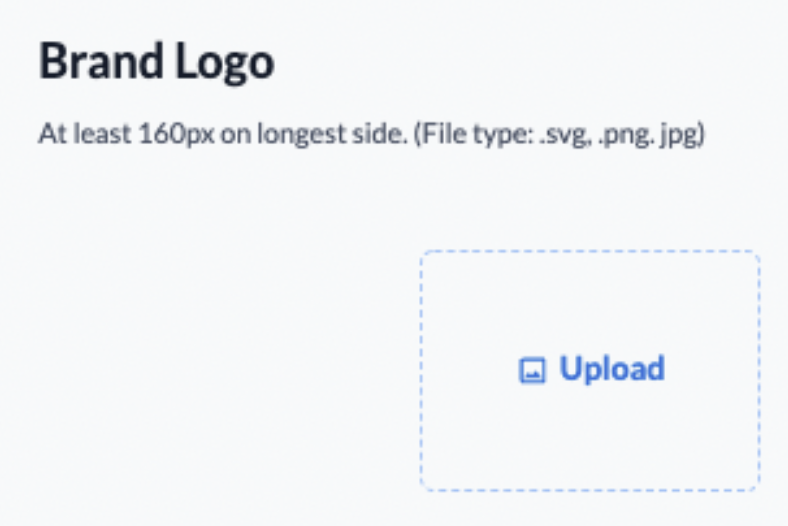
The file type should be either svg, png, or jpg. Choose your file and click Save Changes to save your brand logo.
To add or change your primary or accent brand colors, you can either enter a hex code in the “Enter Hex Code” field or click Color Picker. Then click Save Changes.
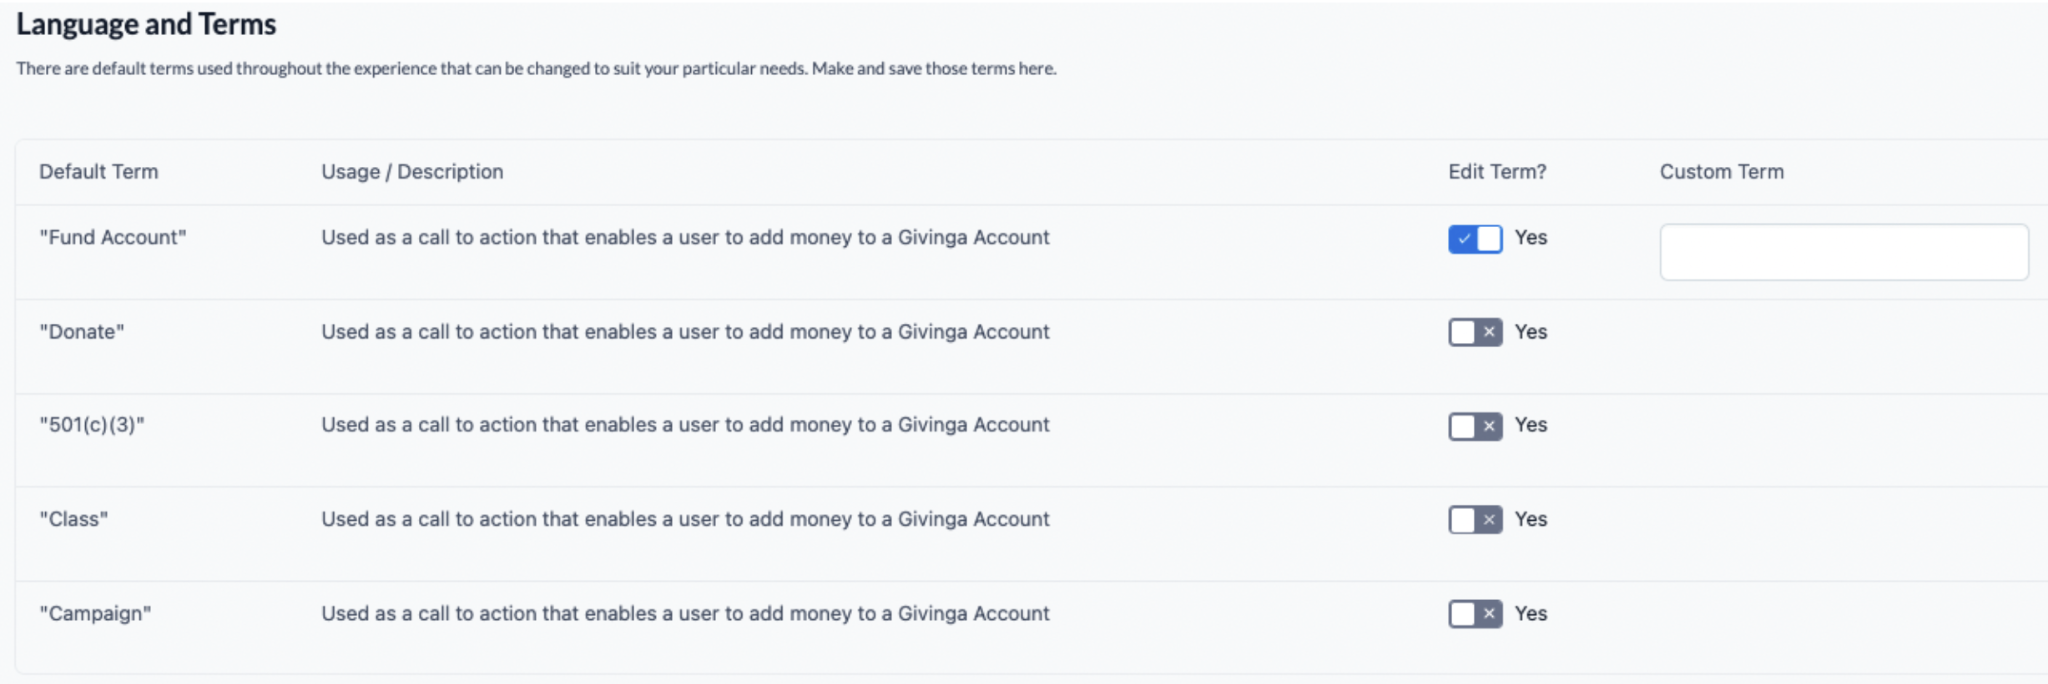
Edit Language and Terms
There are default terms and language used throughout the experience that can be changed to suit your particular needs.
To edit these terms scroll to “Language and Terms,” find the term you wish to edit and switch the “Edit Term?” column to “Yes.” This switch enables the field in the “Custom Term” column. Type in the custom term you want to use to replace the default term. Then, switch the “Edit Term?” column off.
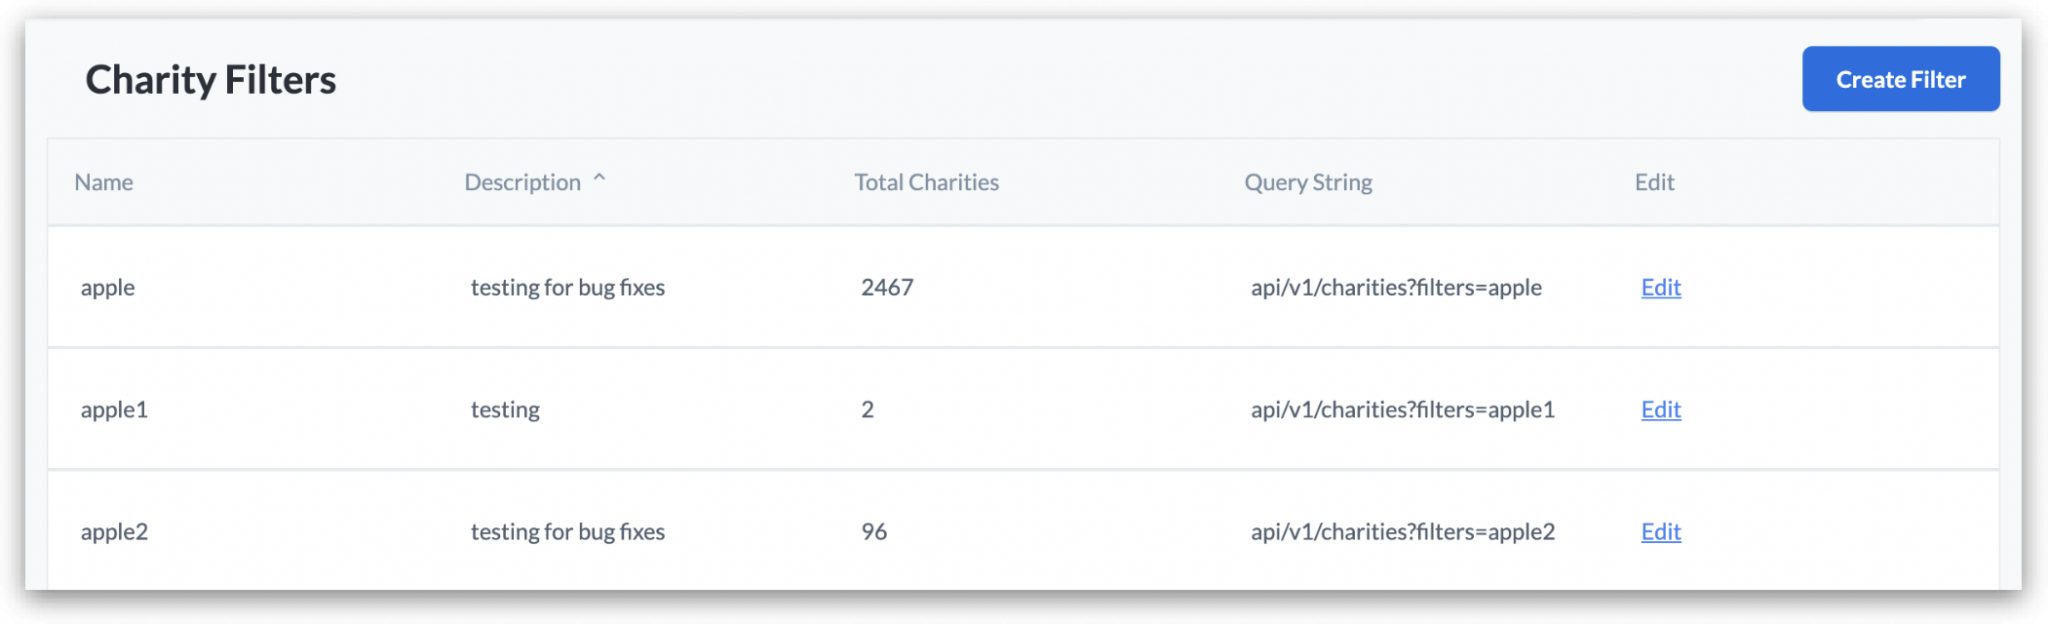
Filters help display relevant information based on criteria you create. It temporarily eliminates the irrelevant entries from view.
At a Glance
- Create filters by setting rules
- Edit current charity filters
Create a Charity Filter
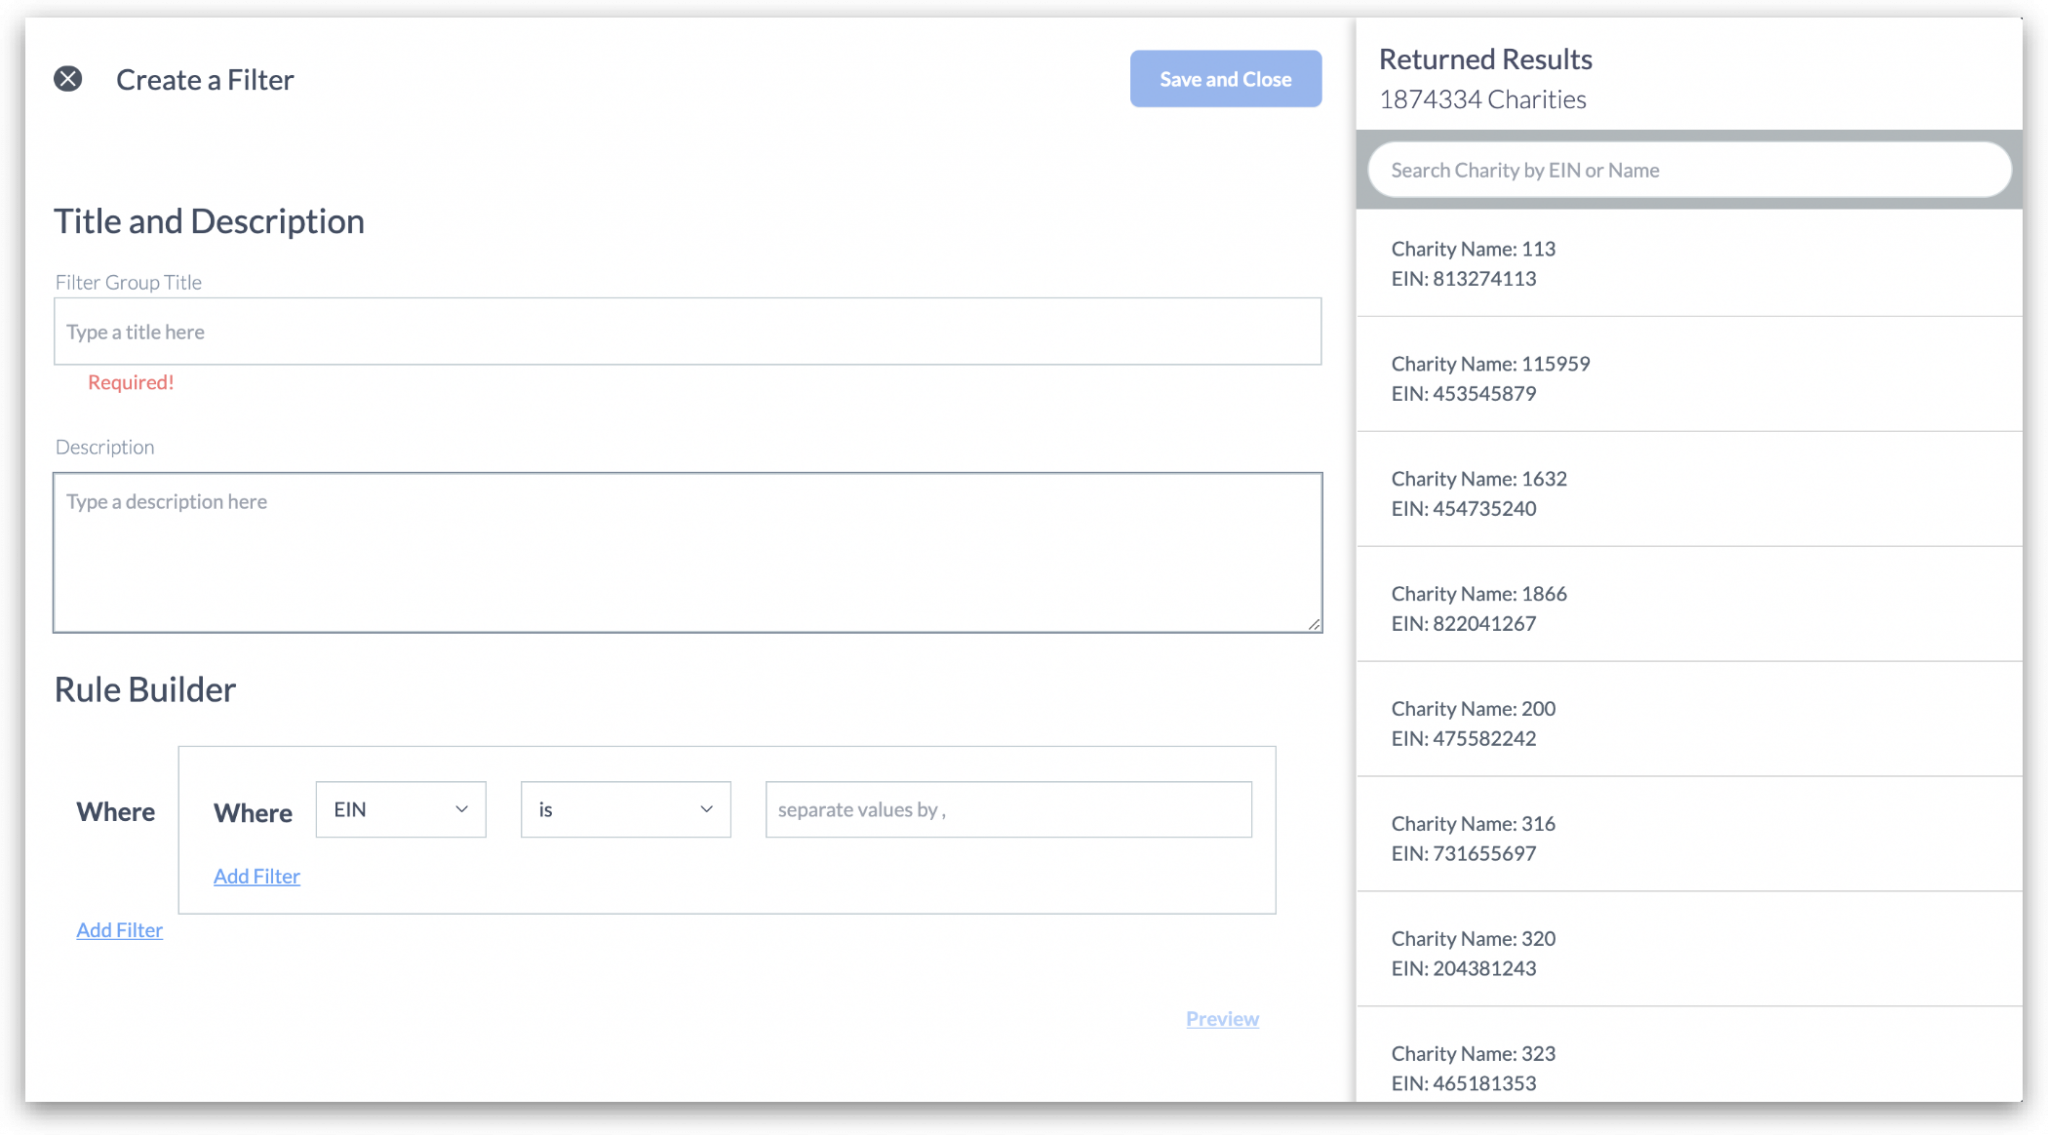
To create a new charity filter, click Create Filter.
The “Create a Filter” window opens with blank fields and options to fill in:
- Title and Description
- Filter group title
- Filter description
- Rule Builder
- Filter rules
- Add filters
You can preview returned results based on the inputs of the filter. These results are returned under “Returned Results.”
Edit a Charity Filter
To edit an existing filter, locate the charity filter you want to edit and click Edit.
The “Create a Filter” window appears, allowing you to…
- Edit filter group title
- Edit filter description
- Edit filter rules
- Add filters
- Preview returned results
Once you’ve made edits, click Save and Close. The window will close and the edited information will be updated.
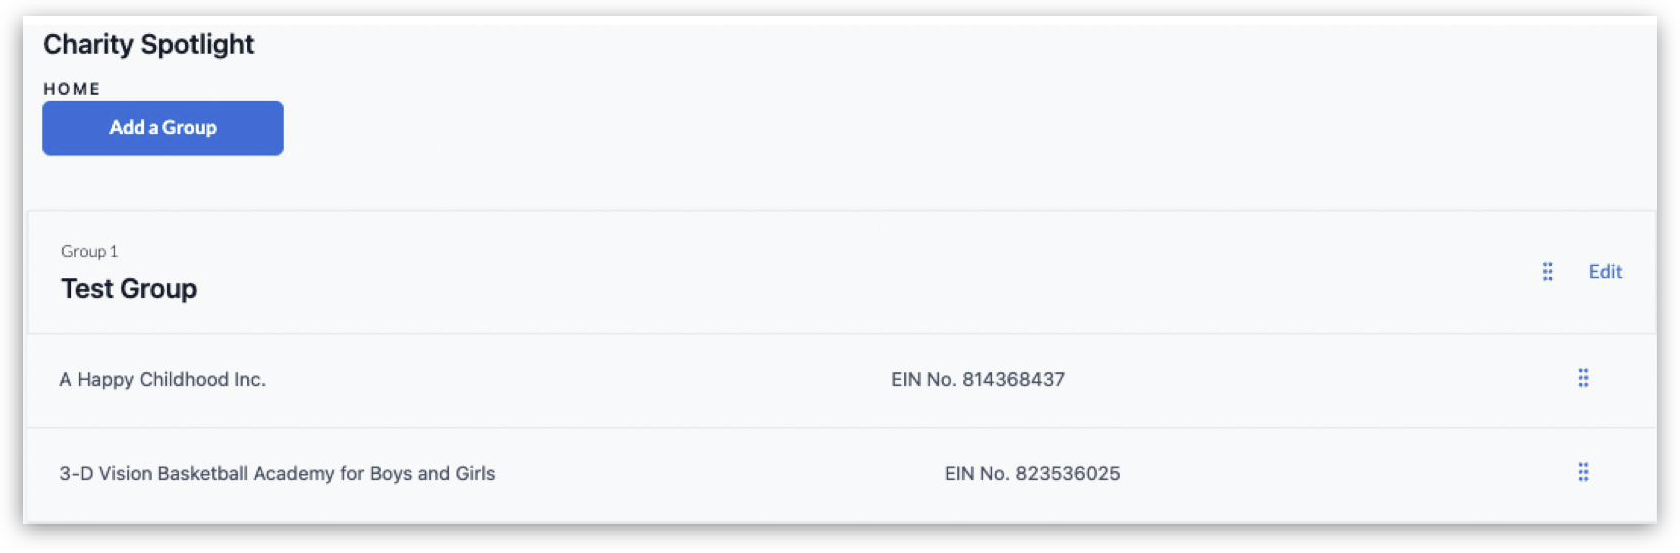
A Charity Spotlight Group is a section that showcases selected charities. These sections are found on the homepage and the Discover page. You can create and customize multiple spotlight groups.
At a Glance
- Create a Charity Spotlight Group
- Change the Order of a Spotlight Group
- Create a Discover Page Charity Spotlight Group
Create a Homepage Charity Spotlight Group
To create a homepage charity spotlight group, navigate to the ”Home Page Spotlight” under the top navigation tab “Content” of the “Workplace Configuration” menu.
Then, click Add a Group.
Create a Group/Section Title (Required). Then click Add a Charity. You can search for a charity by name, location, or EIN. You can also upload a charity logo by clicking Upload.
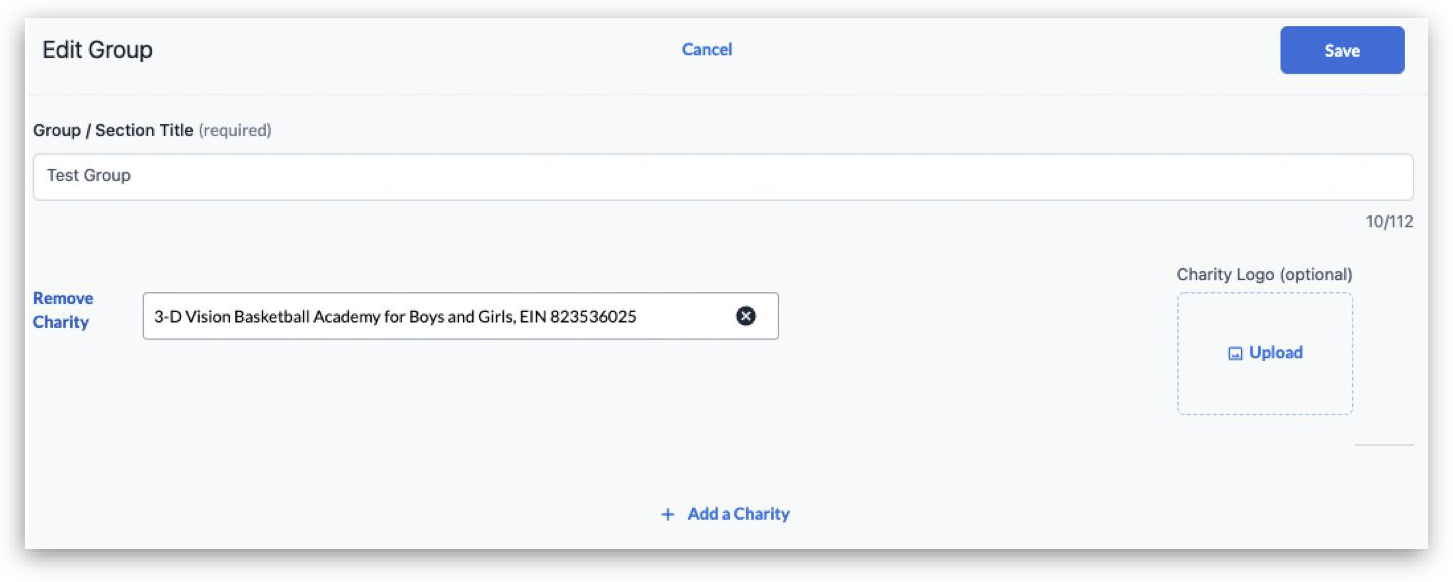
Finally, click Save to update the Charity Spotlight Group.
Follow these same steps to add additional spotlight charities.
Change the Order of a Charity or a Spotlight Group
To change the order of a charity, click the blue dots next to the charity or group you want to move. Drag the item up or down to move the order in which its listed in the group.
To edit a charity group, locate the group you want to edit, and click Edit. A new window opens with the editable fields. You can also delete a charity by clicking Remove Charity.
Create a Discover Page Spotlight Group
To create a homepage charity spotlight group, navigate to the ”Discover Page Spotlight” under the top navigation tab “Content” of the “Workplace Configuration” menu.
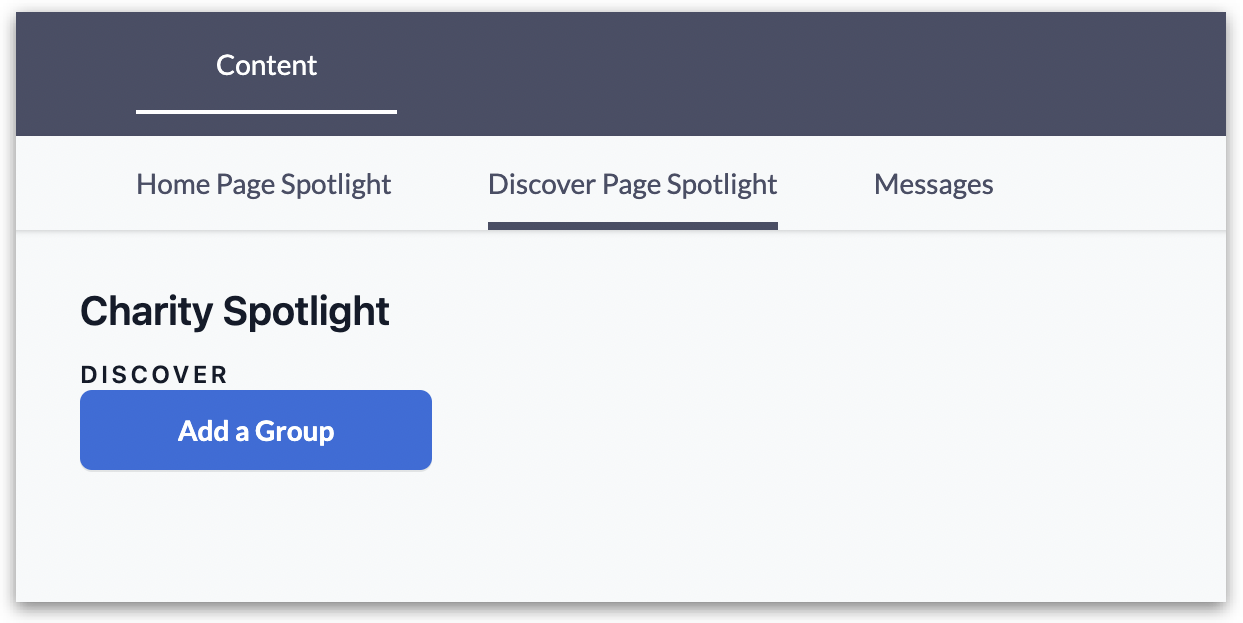
Follow the same instructions as the Homepage Charity Spotlight Group section to manage these settings.
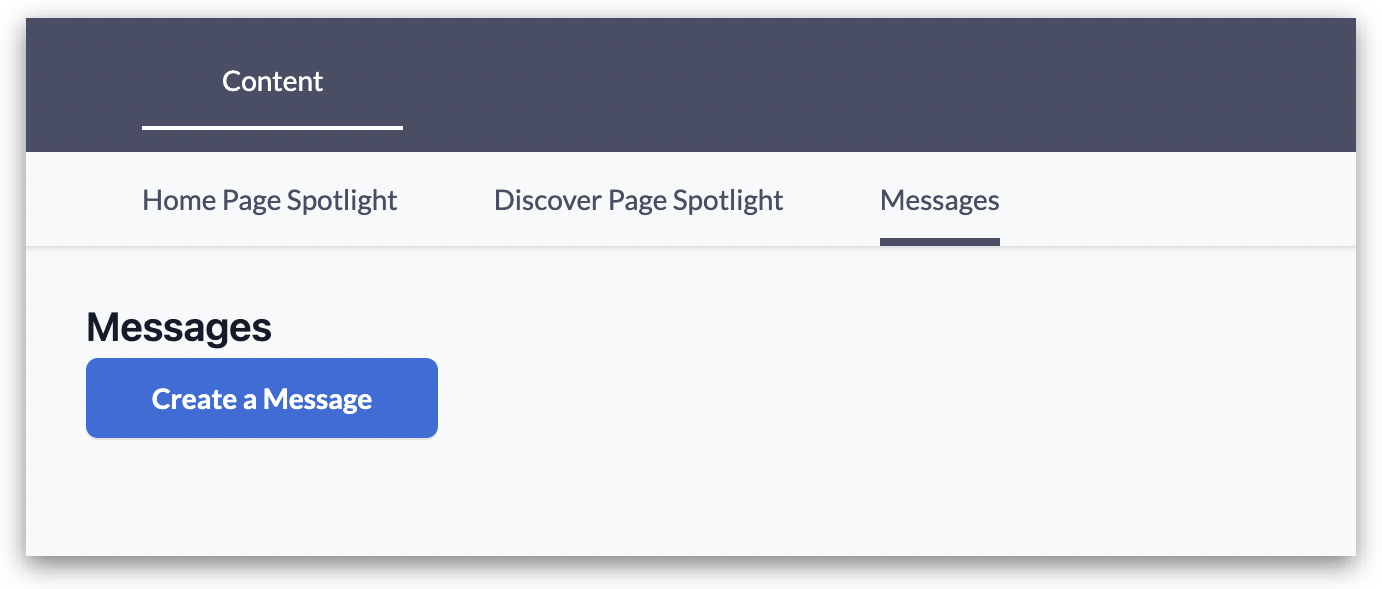
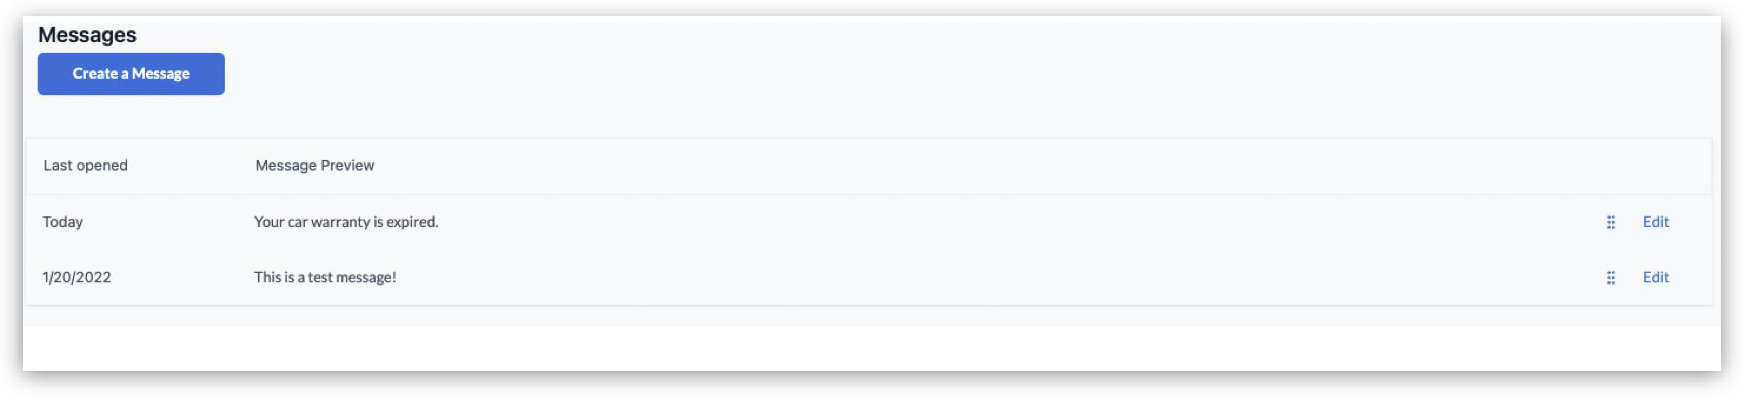
The messages settings controls the messages that are displayed to your home page. You can create and edit messages and place them in any order you want.
At a Glance
- Create a Message
- Edit a Message
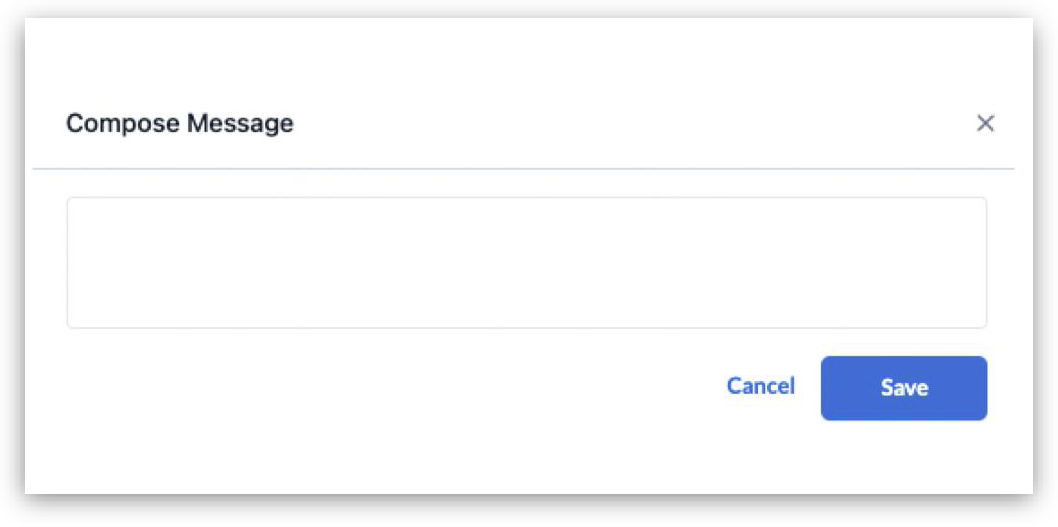
Create a Message
To create a message, navigate to navigate to the ”Messages” under the top navigation tab “Content” of the “Workplace Configuration” menu.
Then, click Create a Message.
The following window provides a text field to create a message. Type in your message in the box. Then click Save to save and create the message.
You can edit messages by clicking Edit next to the message you want to edit.
To change the order of the messages, click the blue dots next to the message you want to move. You can drag it up or down to move the order in which the messages are listed.
The Campaigns functionality enables admins to create a campaign with a dedicated page and promote it on the Philantech® platform, allowing employees to donate and share.
The “Campaigns” tab is found on the left menu (depending on your admin configuration) either under “Consumer Content” or “Workplace Configuration”.
At a Glance
- Create/Schedule Campaigns
- View/Edit Campaigns
- Distribute Funds
- Share the Campaign!
Create/Schedule a Campaign
Click on the “Create a Campaign” button on the top right.

Complete the “Create a Campaign” form:
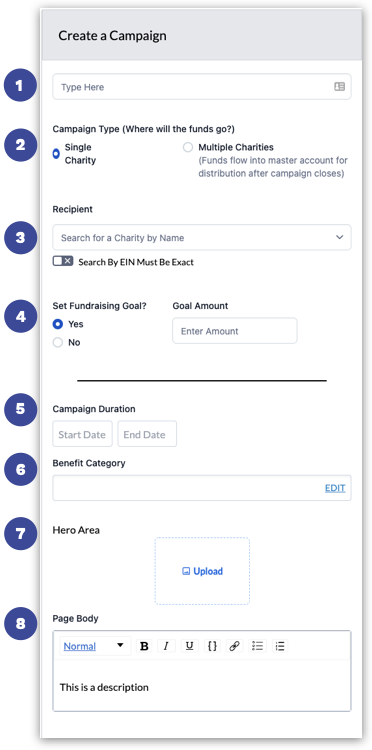
- Enter a campaign title
- Select the Campaign Type (Where will the funds go?)
- Single Charity
- Multiple Charities
- Recipient – Select the charity that will receive the funds
- Search by charity name or EIN
- This field will not display if “Multiple Charities” is selected under Campaign Type. You will need to choose the different charities during the distribution process.
- Set Fundraising Goal?: If “Yes”, enter the goal amount
- Campaign Duration: Enter start and end dates. The end date closes the campaign, and donors will no longer be able to donate from the campaign page.
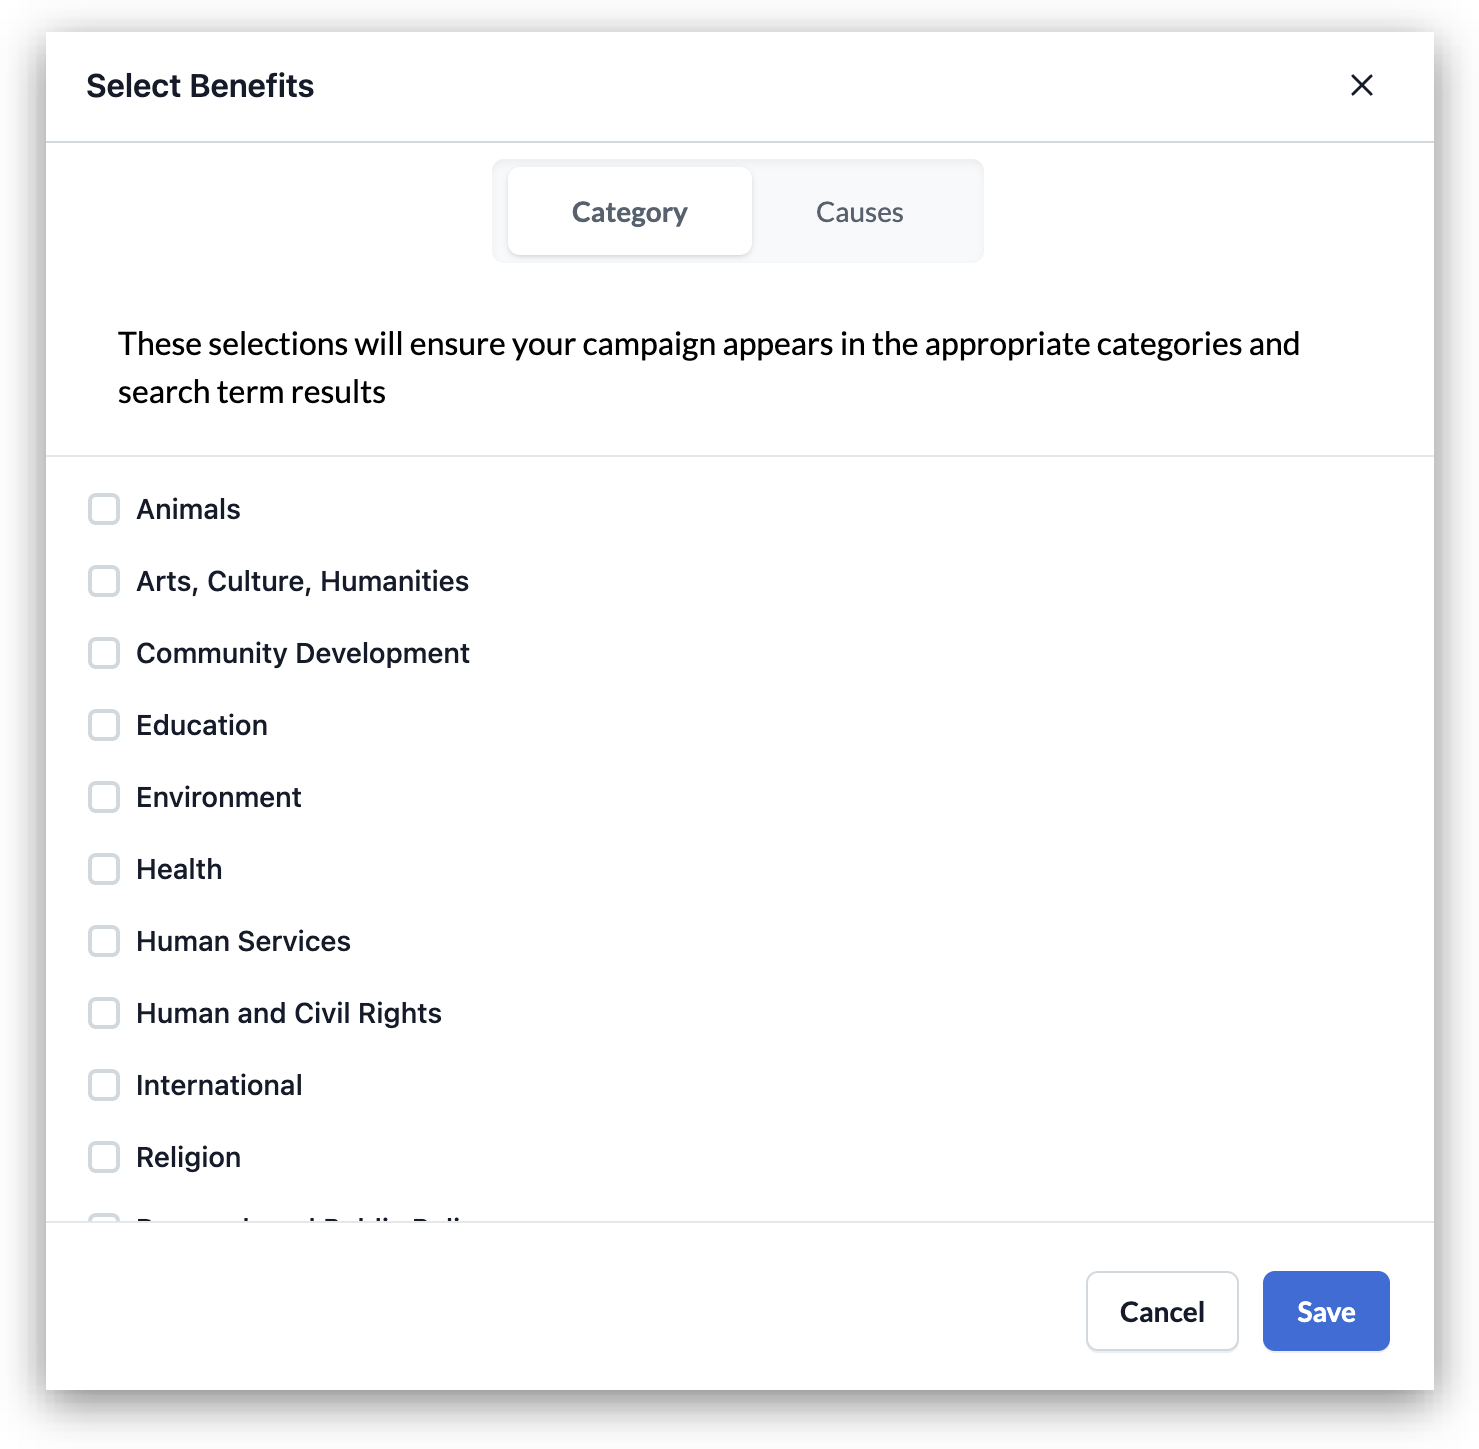
- Benefit Category

- Click “Edit”. Select as few or as many under the “Category” and “Causes” tabs that apply to the campaign.
- Click “Save” to save your selections
- Hero Area: Upload an image to be displayed on the Campaign page.
- Page Body: Type a description to be displayed on the Campaign page.
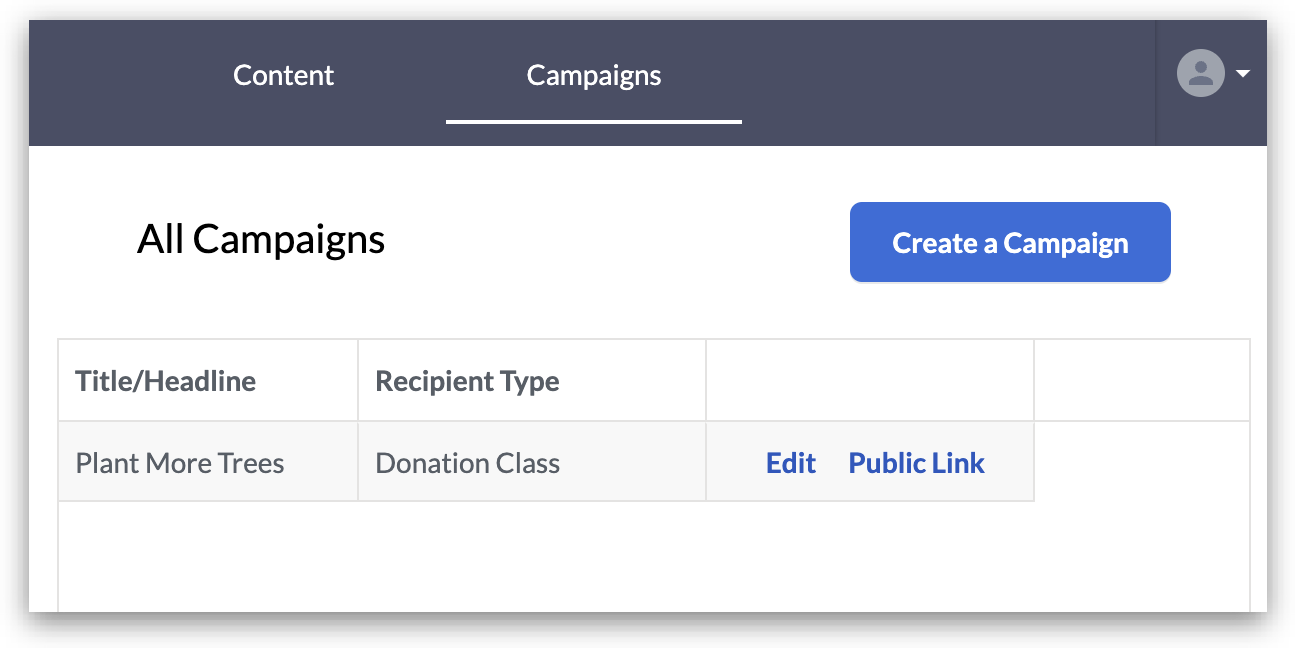
View/Edit Campaign
All saved campaigns can be found in the “All Campaigns” page under the “Campaigns” tab.
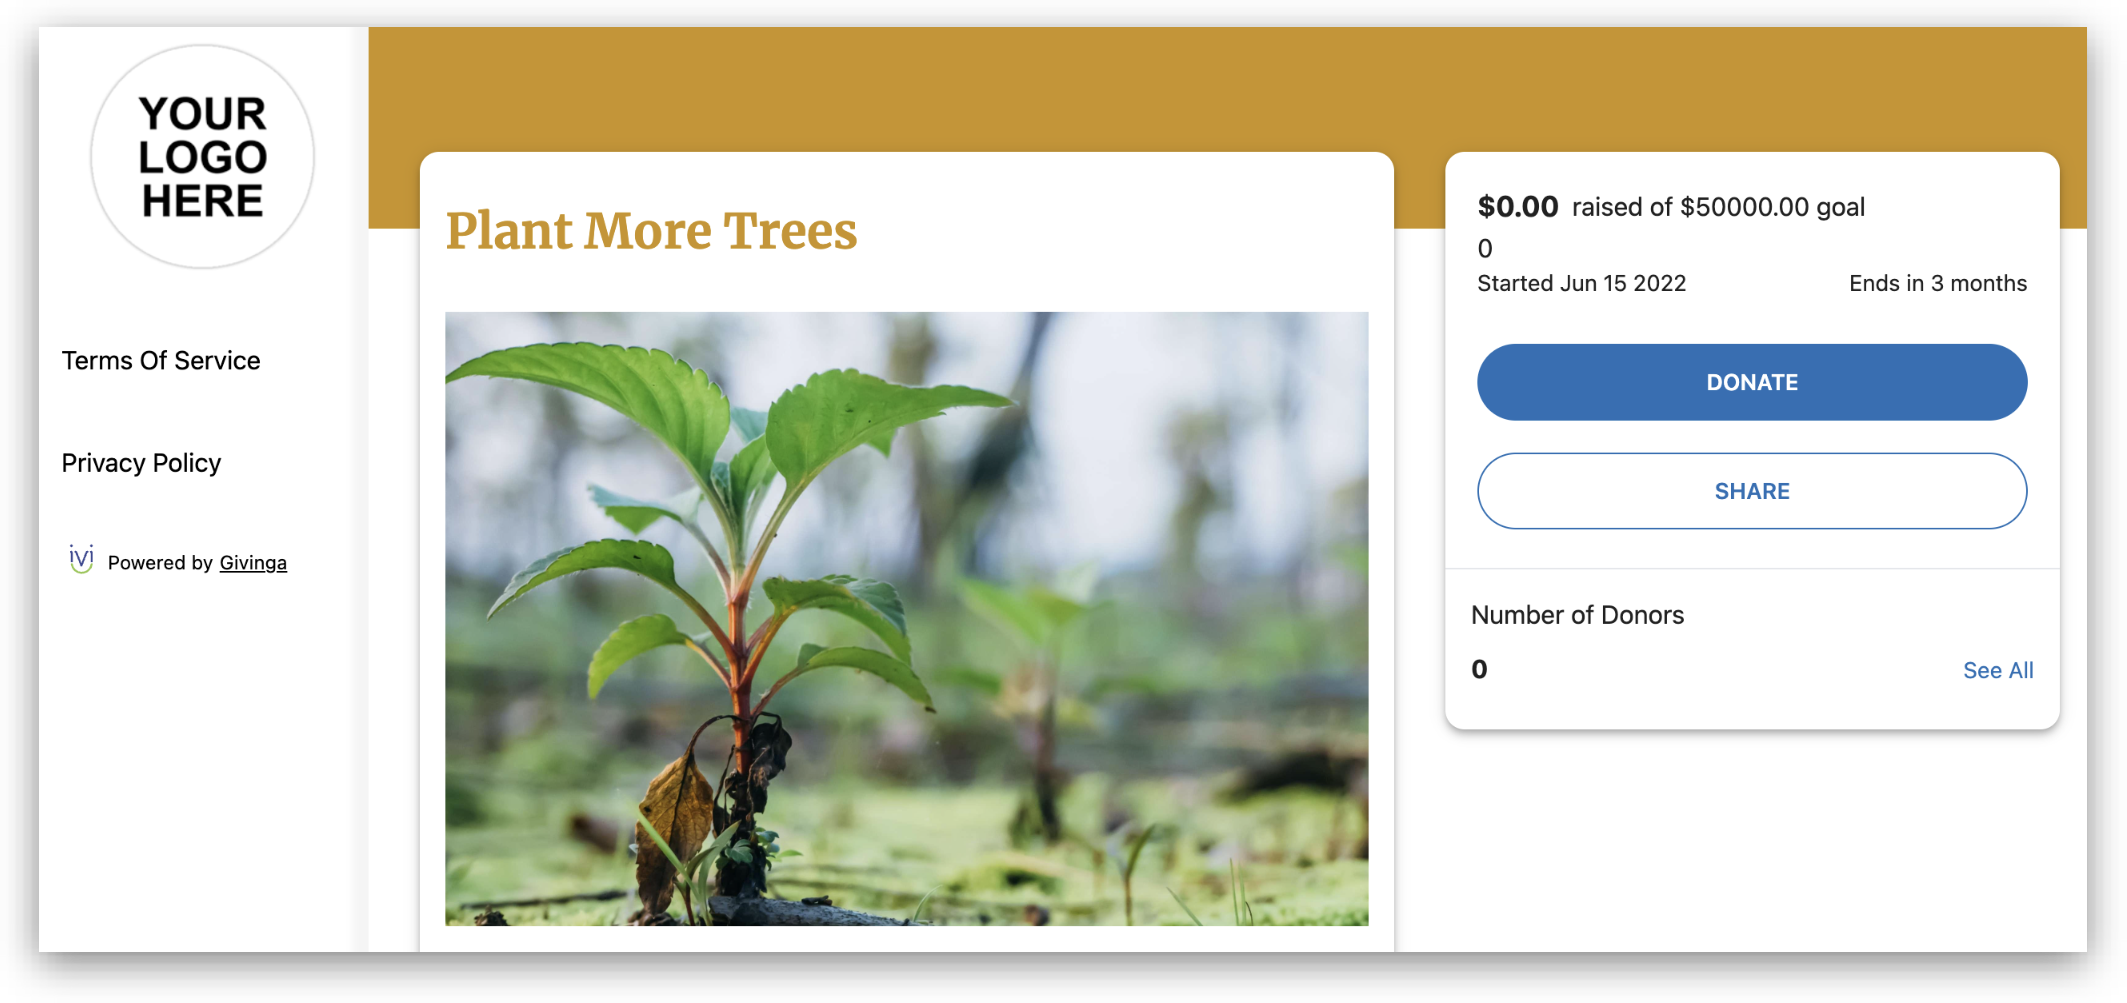
Click “Public Link” to visit the public campaign page created from the “Create a Campaign” form.
A new webpage of the public campaign opens. This campaign link can be shared for more exposure and can also be placed on the front page carousel of the employee giving platform.
To edit details of the campaign Click “Edit”. Note that the following fields are NOT editable:
- Recipient(s)
- Original Goal Amount
- Current Balance
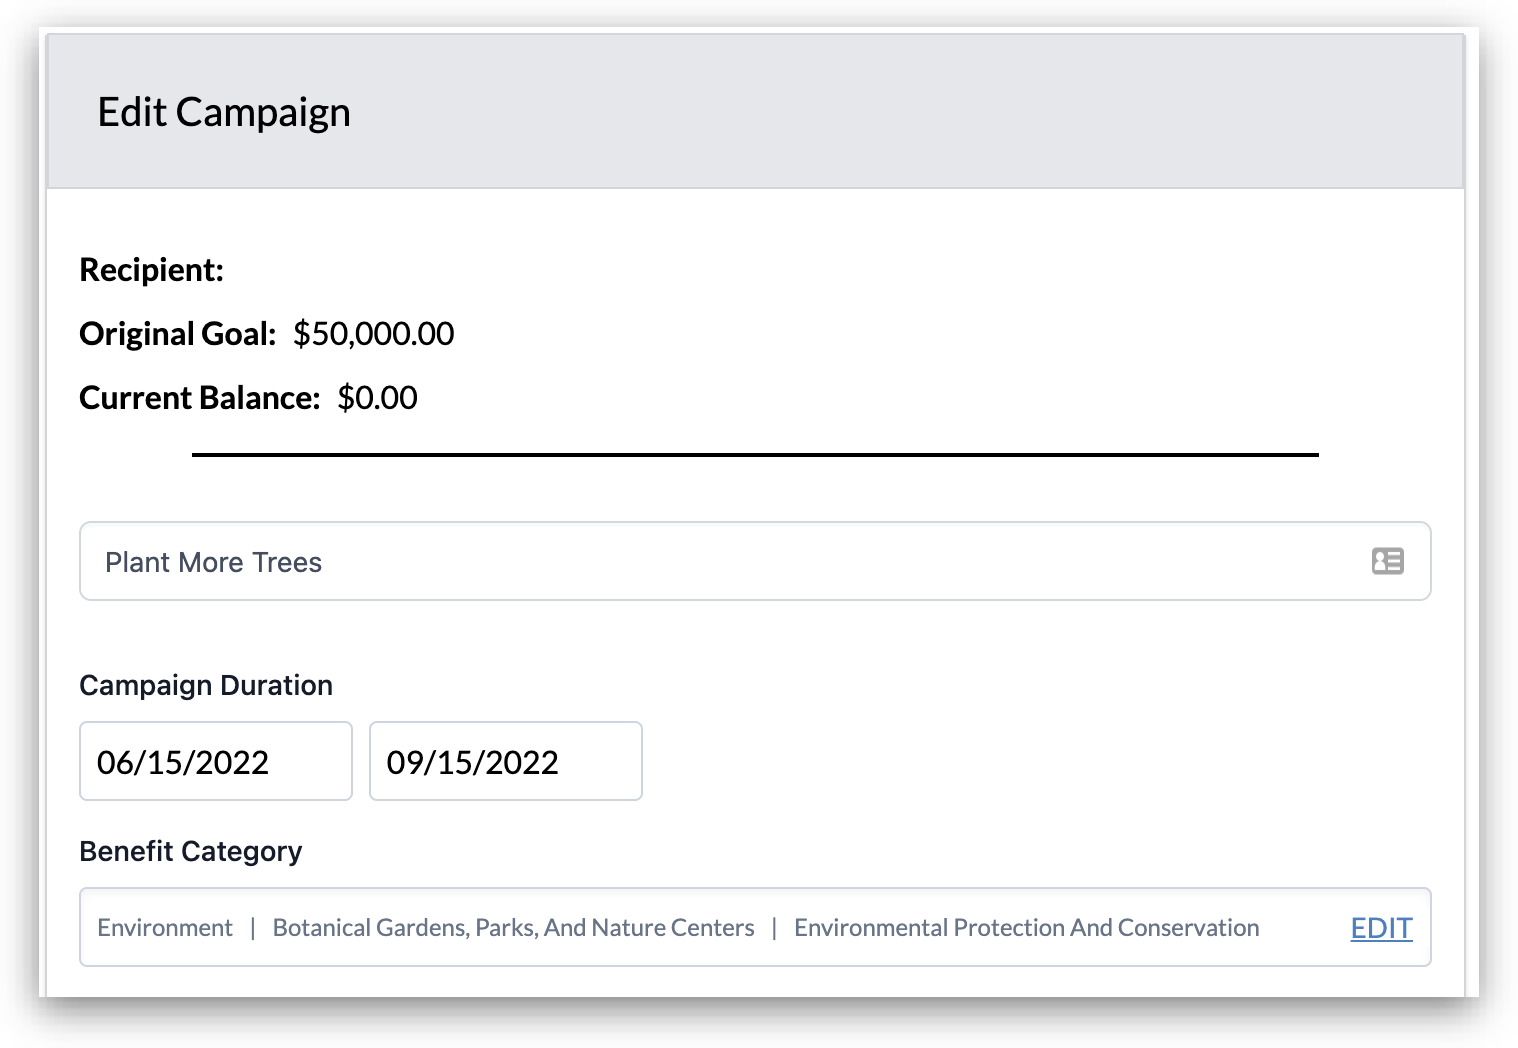
Click “Save” to save the changes.
Delete a Campaign
NOTE: A campaign that has received donations CANNOT be deleted.
Once donations have been made to a campaign, the campaign information will remain on the “All Campaigns” page before, during, and after the campaign.
A campaign is completed on the “End Date” of the campaign. To end a campaign sooner, simply Click Edit and edit the “End Date” for the desired new end date.
To delete a campaign, on the “All Campaigns” page, locate the campaign to be deleted and Click “Edit”.
Under “Campaign Tools” on the right, click the “Manage” tab.
Click “Delete Campaign”. This option will not display if funds have been donated to the account.
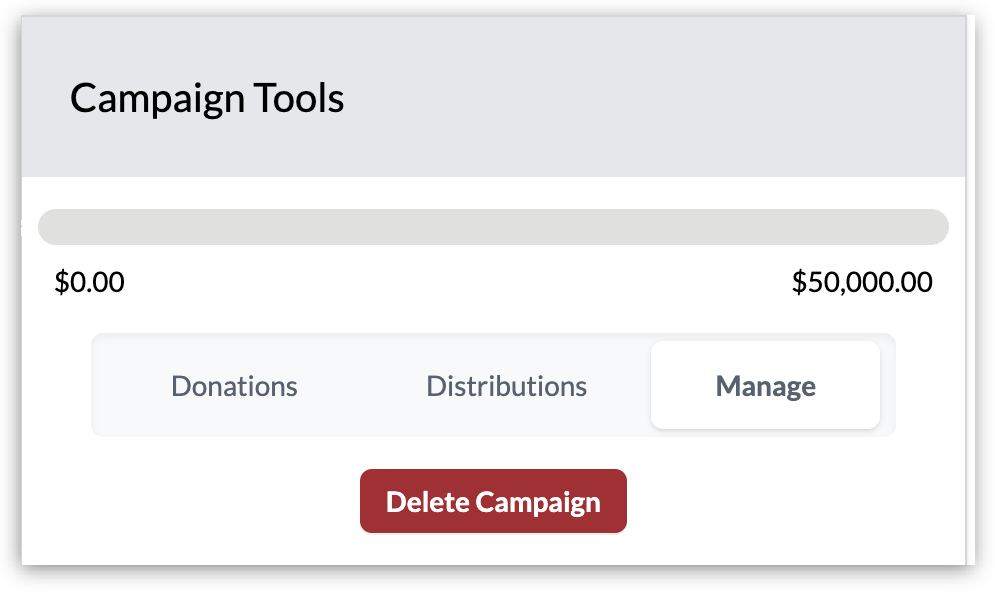
The campaign is no longer active and will be removed from the “All Campaigns” page.
Distribute Funds
Funds can be distributed to the charities at any time during and after the campaign. These funds come from all donations made from the campaign page and are placed in a subaccount designated for the campaign.
On the “All Campaigns” page, locate the campaign that needs to have funds distributed and click “Edit”.
Under the “Campaign Tools” box on the right side, click the “Distributions” tab. You can view all distributions made on this page.
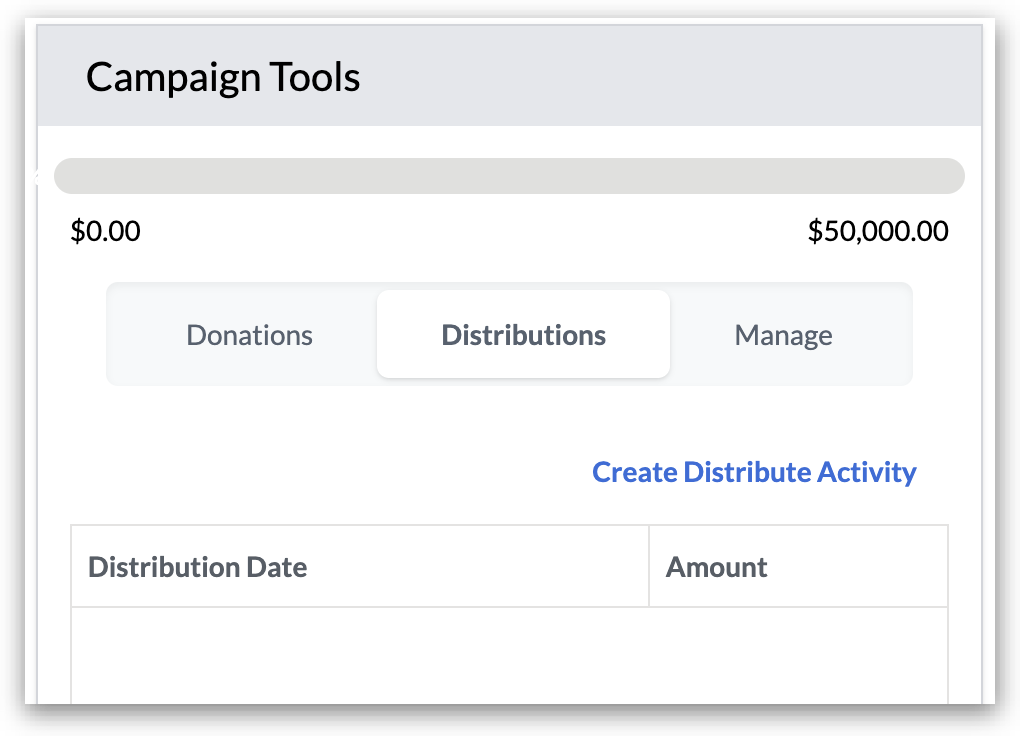
Click “Create Distribute Activity”.
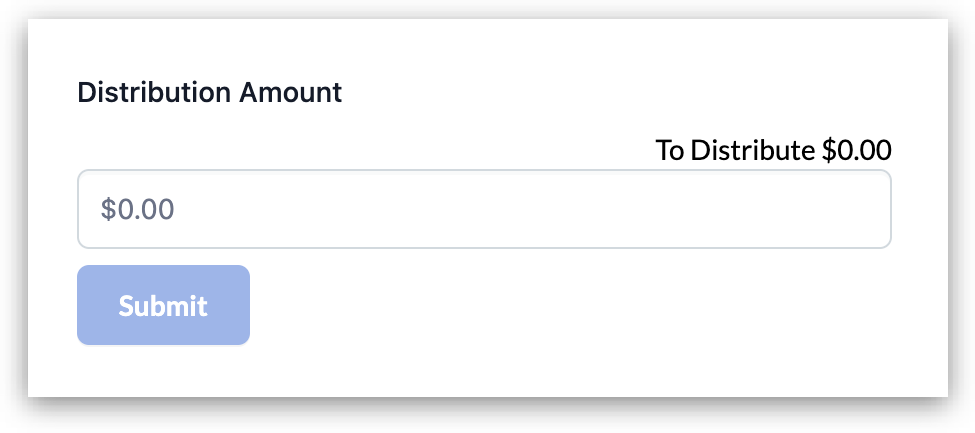
Enter the distribution amount in the field.
Click “Submit” and the amount will be distributed to the charity(ies) selected.
Share the Campaign
Now that you have a campaign page set up, it’s time to share the public link with your team and network!
Ways to share your campaign:
- Send a company-wide email with details of the campaign.
- Add the campaign to the homepage carousel of the employee platform.
- Share on your company’s social platforms (LinkedIn, Facebook, Instagram, etc.)
- Encourage employees to share with their network.